Any technology that enables creating modern themes and apps for a large CMS like WordPress easier is a good thing. Even more so if the technology is not only free and open-source but also well-liked among developers. Frontity WordPress fulfills all of these requirements and more. Continue reading to find out how you can get started.
What Is the Meaning of Frontity?
Frontity is a React framework that helps developers create fast websites, apps, or themes for headless WordPress. It’s the framework you use if you are a React dev but want the CMS functionality of WordPress.
How Frontity Works
The Frontity framework allows developers to create React-based frontends for WordPress. You can create any kind of frontend, be it an app, theme, single-page website, or even a simple blog interface using Frontity. After creating the React frontend, you link it to headless WordPress using a REST API.
Connecting your React. js-based frontend to WordPress means you can take advantage of WordPress’s powerful website administration tools as well as the content management system. For example, you can create a React App frontend that fetches data dynamically from a WordPress backend.
The Frontity web interface or app fetches content from WordPress but runs on a separate Node.js server because WordPress is written in PHP.
In a nutshell, Frontity allows you to:
- Code a React frontend with all the good things that come with React JS
- Link the React frontend to headless WordPress decoupling WordPress from its PHP-based frontend (no themes!)
- Manage your web app or website and add content using WordPress
Frontity is an open and free framework made specifically for WordPress with a ton of documentation for those who want to learn it. It is the ideal WordPress framework for React developers and a more feature-rich alternative to the likes of Next and Gatsby.
Wait, What Is Headless WordPress?
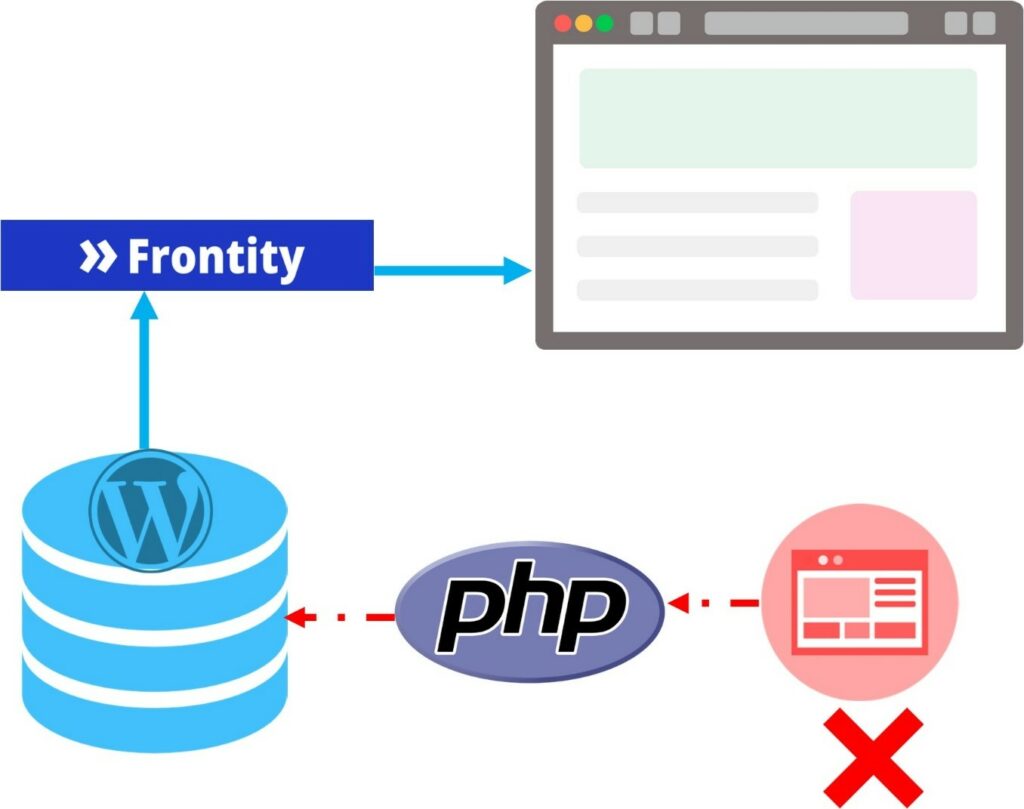
If you are already a WordPress developer or have created themes for WordPress before, then you probably know what headless WordPress is. However, for those new to CMSs, headless WordPress is the CMS without the PHP-generated frontend.
Developers have the freedom to create their WordPress website frontend with whichever language they choose and hook it up with the CMS for content and data management using a Rest API. For instance, you can create your frontend entirely with React and only use the admin console and CMS tools to manage your data and do other configurations.
Frameworks Like Frontity Save You Time
Creating and hooking up a functioning web interface to headless WordPress from scratch can be complicated and time-consuming. This is where frameworks like Frontity come in as they already have many of the scripts and other assets you need to connect to headless WordPress.
Frontity Comes with A Ton of Features and Capabilities
The name frontity doesn’t arouse interest at first especially for devs who build their WordPress themes from scratch. To some, it’s just another framework or library that does what you would typically expect a third-party framework to do.
However, frontity is not your typical framework because it has many powerful features that will make developing for Headless WordPress much easier. Some of the things that make Frontity a good React framework for headless WordPress developers include:
1. Server-Side Rendering with react
Since frontity uses React, themes or sites created with it will use server-side rendering. This enhances site load speeds and SEO. Frontity integrates well with headless WordPress using the REST API. Of course, the same can be achieved without using a framework like frontity but a lot of coding and background setup will be needed.
2. Frontity Is Made for Zero Setup Development
You don’t have to worry about setting up your frontend or WordPress theme from scratch because everything you need is already packaged and ready to use. All the libraries, CSS, headless WordPress REST configurations, binding with Webpack, etc. This will save you a lot of time and resources as you can dedicate your time to creating a good WordPress theme or app interface.
3. Frontity Is Fully Extensible
Using a free and open-source headless WordPress framework like Frontity means you can extend it the way you want to suit your needs. Frontity has been engineered to be extensible through the use of npm packages that are user-created or downloaded from third parties. There is no limit to things you can do with such a simple headless WordPress framework.
4. Frontity Supports Serverless deployment and horizontal scaling
Recognizing the need for lightweight, scalable, and easy to deploy web applications, the Frontity framework is, by design, made for serverless deployment. You can deploy Frontity frontends on serverless services like AWS Lambda. Horizontal scaling is also possible with Node servers.
5. The Framework Supports WordPress Extensions
Tight integration with WordPress using its REST API means the framework can link up with most WordPress add-ons and extensions. You can link up Frontity with already deployed WordPress.com or WordPress.org websites with a few steps.
6. Frontity Support Multi-sites
Just like WordPress, the Frontity framework allows you to link up to more than one website with a single installation. You can even mirror data from one site to another with a single line of code using jQuery.
Other features and unique characteristics of the Frontity headless WordPress framework include:
- Code splitting-The framework uses code splitting by design which allows you to create smooth frontends for your web applications.
- Supports React concurrent suspense
- Supports Typescript- You can use Typescript instead of JavaScript with the framework as it’s supported right off the box
- Supports ES6
- Frontity is one of the smallest React bundles out there
- Instant in-app navigation for smooth user experiences
Frontity is indeed an interesting React framework for headless WordPress. Given the support it’s getting from contributors, the framework will certainly keep getting better and better. The best thing about it though is how easy it is to learn as you shall see in the remaining sections of this tutorial.
Using Frontity With WordPress By Example
This is a step-by-step process using a practical example of how to download, set up Frontity and create your very first Frontity project. Later on, we’ll show you how to connect it to WordPress and edit your app or website.
Requirements
A WordPress installation – this can be a development install hosted locally or a running WordPress install hosted on a live webserver.
A Node.js dev and runtime environment- You should already be running a Node.js runtime environment to use Frontity. Make sure your Node version is 5.20 or higher so that you get access to the pre-bundled Node Package Executer (NPX) CLI tool. You’ll need it to download and install Frontity so you can create your project.
Creating Frontity Project- Step by Step
Creating a Frontity project is the simplest step in the process as you only need two or three CLI commands in a Node.js runtime environment or command line. We recommend that you use a text editor that allows you to launch the node CLI within the editor and view the project files.
Step 1– Open up a Node.js command-line interface
Step 2: Enter the following npx command to download and install the Frontity WordPress framework on your development server:
npx frontity create my-first-frontity-project
Entering this command will download the Frontity framework, install it and execute it. A new Frontity project named “my-first-frontity-project” will be created in your current directory. By the way, you can replace this name with your actual project name from the word go.
Step 3: Next, you will be asked to pick a starter theme. We suggest you with the default Mars theme for now as you will be programming your interface using React anyway.
Step 4: Your new Frontity project should be created at this point and all the necessary start files and directories will be inside the project folder. You can navigate to your project folder with the following command:
cd my-first-frontity-project
Step 5: Now you can execute your new Frontity project and have the demo site show up in your browser. The new project will be launched inside a local development server using Node. Use the following command to do this:
npx frontity dev
At this point, your Frontity project should be up and running and you can view the demo on your website by navigating to localhost:3000 if the site wasn’t automatically launched. You are free to start making changes and building your React app inside the project folder by editing and adding new files.
First things first though, you’ll need to connect your Frontity project to Wp so that it can fetch data from the CMS. You are free to stop after connecting the two and using the default Frontity theme. Next, we show you how to connect Frontity to WordPress.
How do I connect Frontity to WordPress?
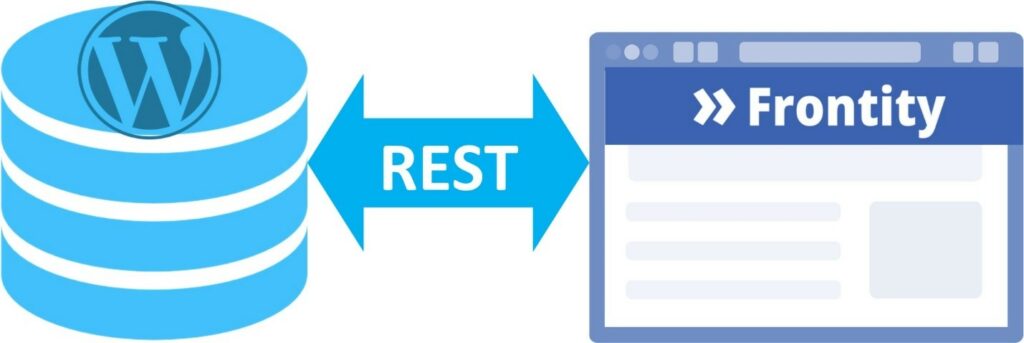
You can connect Frontity in very few and straightforward steps using headless WordPress’s REST API. You of course need to be working in a Node development environment, have a server up and running with WordPress installed, and understand how to install and execute node packages using npm and npx.
How to Connect Frontity To WordPress Step by Step
You need to have at least a set frontity to run on your local or webserver to connect it to WordPress.
Step 1: Open your already set up Frontity project folder either through your operating system’s file explorer tool or in your preferred development editor directory listing. The default folder for most Frontity projects is /users/my-project. You can also navigate to this location by using the command cd/users/my-project.
Step 2: Locate the frontity configuration file named “frontity.settings.js” and open it with your development text editor. The file is in the primary project folder.
Step 3: Locate the line with the Frontity API URL in the configuration file you just opened. This is where you will instruct Frontity to point to your WordPress installation as opposed to the demo Frontity page.
By default, a new Frontity install points to demo content on the URL https://test.frontity.org/wp-json. Change that URL to point to your WordPress website on your server. For example, if you have WordPress installed on a local server using XAMMP or WAMP, you could change the URL to something like “https://localhost:8888/wordpress/wp-json”.
By changing your API URL, you will be connecting Frontity to WordPress and essentially telling it to look for content stored in the CMS. The structure of the default React-based Frontity frontend will remain but your WordPress content will be fetched and shown on your browser.
Step 4: Finally, make sure you save the updated frontity.settings.js before you close it. Congratulations, you have successfully connected Frontity to WordPress. The next steps should be to start building your Frontity website or web app using React.
How Do You Use Frontity?
Frontity allows you to code React themes and web interfaces for WordPress. You can create any theme or interface you want from scratch using React or by modifying Frontity themes to your liking.
After creating your first project, your next step should be to start thinking about creating a new package or WordPress theme that includes the following components:
- Menus
- Post designs
- CSS styling
- Behavior- for interactive elements like buttons, menus, and animations
- Custom post design and other elements depending on the design of your website or app
You use Frontity by linking it to a WordPress hosted on a server. Instead of using the default Wp PHP frontend to manage the display of your website or web application, Frontity will take over. You can even run both frontends side by side as you change from the old PHP-generated interface to the new one.
Use Frontity For Building WordPress Apps
While a typical Frontity setup may be primarily used to create themes and website interfaces that are connected to headless WordPress, you can use its functionality to create powerful apps. This is because Frontity opens up opportunities to use the entire power of React. You can even create single-page applications that utilize the WordPress CMS and dashboard for data management.
On top of the things you can create from scratch, using Frontity also allows you to tap into its rich plugin and package repository. Some of the plugins will allow you to add functionality to your WordPress application without coding while others add new features and styles.
Configuring Your Frontity App
You will be modifying your Frontity app by editing the configuration script inside your project. Most of the settings you need to get your app up and running can be located in the “frontity.settings.js” file that you can open up in your text editor and change the values you need.
For example, you can change the default theme to your new theme by editing the section that contains theme information in the file. Just make sure that you maintain the syntax used in the configuration script. Refer to the Frontity documentation if unsure about anything when configuring your Frontity app.
Styling Your Frontity Theme With CSS-In-JS
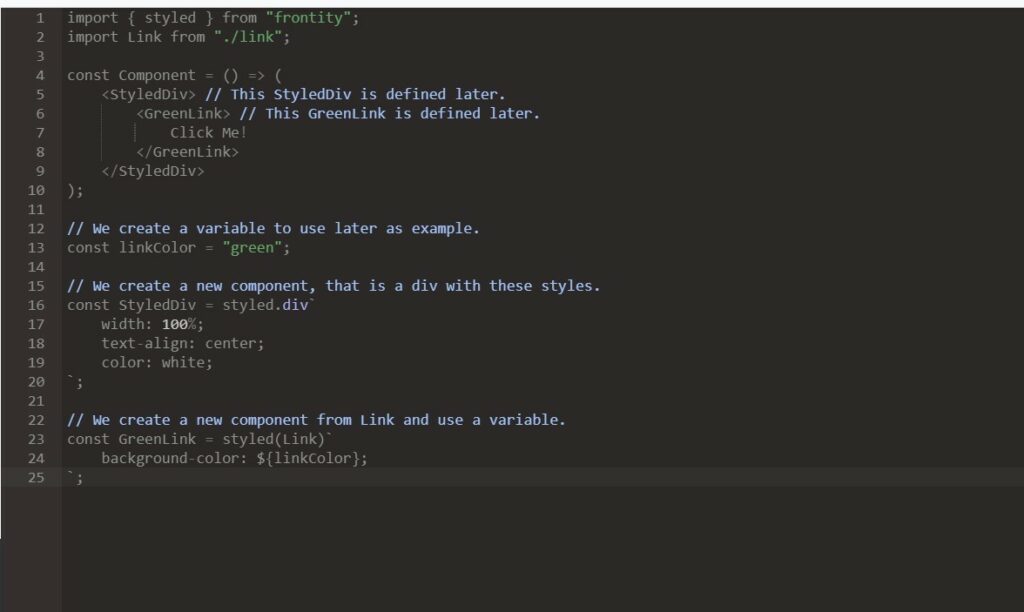
You will be using CSS in JS to style or modify the appearance of your Frontity them. Frontity’s CSS in JS is a combination of CSS and React.js that allows you to create React components from HTML tags and style them as you want. It’s a simple but powerful approach to styling your theme that takes advantage of JavaScript dynamic loading and CSS.
Here is an example of Frontity styling done with CSS-in-Js.
Deploying Your Frontity App
The last step after designing your Frontity app or theme is to move it from the Node.js development server environment to a live server where it will be accessible publicly. While it is deployed., it will also maintain the ability to fetch content from your WordPress CMS. You will also be able to use the WordPress dashboard.
There are many services you can use to deploy your Frontity app to the open web but the folks at Frontity recommend using Vercel- a cloud service that is tailor-made for serverless functions. To deploy your Frontity appl on Vercel, you first need to create an account with them. Then you will follow a simple step by step deployment process by Frontity that involves:
Login to your Vercel account using npx
Creating a Vercel.json file and finally deploying your app.
NB: You don’t have to use Vercel when deploying your Frontity apps. There are other similar services out there you can use. However, the deployment process varies depending on the service you choose but it should be simple and quick.
All in all, Frontity is a great React framework you can use to quickly create powerful apps that take advantage of WordPress’s powerful content management features. Book a service with us today if you want your Frontity application developed or need help with your Frontity projects. Happy coding!

