There has never been a time when the demand for software developers or application engineers was as high as it is today. You would think that pretty much every other software and tool has already been built but no, new challenges crop up every other day, and those who find the best software solutions usually gain that coveted competitive advantage.
What Is the Definition of Software Development?
Software development in a business context is an all-encompassing term used to refer to all the activities involved in the creation and routine improvement of computer solutions (software) for real-world business problems. For instance, a medical facility can choose to develop software to streamline communication between different departments for better inpatient and outpatient care.
How Does Software Development Add Value to Your Business?
There are many direct and indirect benefits of having a software development arm in your business either developing a cutting-edge solution for you or external users. Here are some of them:
Gain Competitive advantage using cutting edge solutions
Since the introduction of business software in the 90s, companies have always used them as a deafferenting factor to gain competitive advantage. The company with the best most refined software system usually edges its competitors because software is primarily designed to support efficiency and process optimization.
For example, a company that uses an efficient software solution to manage schedules in its operations can gain an advantage over its closest competitors who are using manual systems or outdated scheduling systems. Sometimes all you need is a tiny gain in terms of performance in operations to increase efficiency and move ahead of your closest competitor.
The emergence of data-driven software designed to use machine learning has made the software even more important for businesses. Only businesses that have access to cutting-edge software, preferably from an in-house team or custom software development company, can take advantage of these new opportunities to gain a sustainable competitive advantage.
Higher ROIs for Your Business
You stand to gain a lot as a business by investing in a software development team to develop solutions either for your business or for third parties. The return on investment for custom software that solves a specific problem well is usually quite attractive even for small businesses. The ROI is either realized internally when you use the software to optimize your processes or when you sell the software to third parties.
Your business will also enjoy the benefits of not having to do recurring payments to an external vendor should you choose to hire an internal bespoke software development team. The same can also be achieved if you choose to work closely with an external custom developer who will develop your software and license it to you instead of charging you regularly.
Lower Costs Using Automated Solutions
There has been a lot of progress in computing technology in the past few years with faster, more efficient chips and computer hardware coming to market. However, not all businesses are taking full advantage of these new resources to automate their process and lower costs. You can save a lot of money as a business by simply investing in software that solves specific problems in your business.
As an example, a food processing company currently uses a manual register to track the number of workers who report to work and the number of hours they work. However, workers have discovered a loophole in the manual system and usually collude with supervisors who change their working hours o compensate for sick days and days missed to receive full pay.
In the above example, the fruit processing company can reduce its labor costs significantly by developing an automated register that uses blockchain technology to record hours worked and calculate payments. Blockchain systems offer a high level of transparency using immutable ledgers that make it impossible for anyone to make changes that cannot be tracked or recorded for validation.
There are many other ways you can use custom software to lower business costs. Working with a dedicated software development team guarantees that the solution developed is just right for your problem and you will start using it to enhance whichever business process it was made for immediately. In contrast, you may have to do some trial and error and modification to get third-party solutions to work for you.
Use Custom Software to Improve Value
The primary goal for any business is to create value for their customers which will in turn win their trust and loyalty. Providing value in business simply means ensuring your customers are satisfied or happy or satisfied or happy with the product or service they purchase from you. You can rely on custom software to improve the quality of your end product and possibly make it even better.
As an example, a company offering social media advertising services can improve the quality of its campaigns by developing an application that uses Ai to read, analyze and predict trends using readily available data. While there could be several tools out there that do something like this, developing a custom solution gives that edge because you have better control over how your data is analyzed and the data points used to create targeted social media campaigns.
Access to Readily Available Support and Regular Maintenance
A great advantage of having a dedicated software development team is the level of support you get from the developers and the fact that they’ll be responsible for maintaining the software. You’ll be able to have problems handled by the developer at a much faster rate compared to when you are using third-party tools. The team will also keep on developing new updates and patches for as long as you are using their product or have a contract with them.
There Is Demand for Bespoke Solutions
The demand for bespoke software solutions is not about to die down even with the emergence of online applications that seem to solve every other problem. The problem with off-the-shelf software is that they are not designed to solve specific business problems in a specific way so businesses have to either modify them or change how they do things. For these reasons, you are guaranteed to have a good ROI if you invest in a development team that produces bespoke software for you to resell.
Technical Examples of Business Software
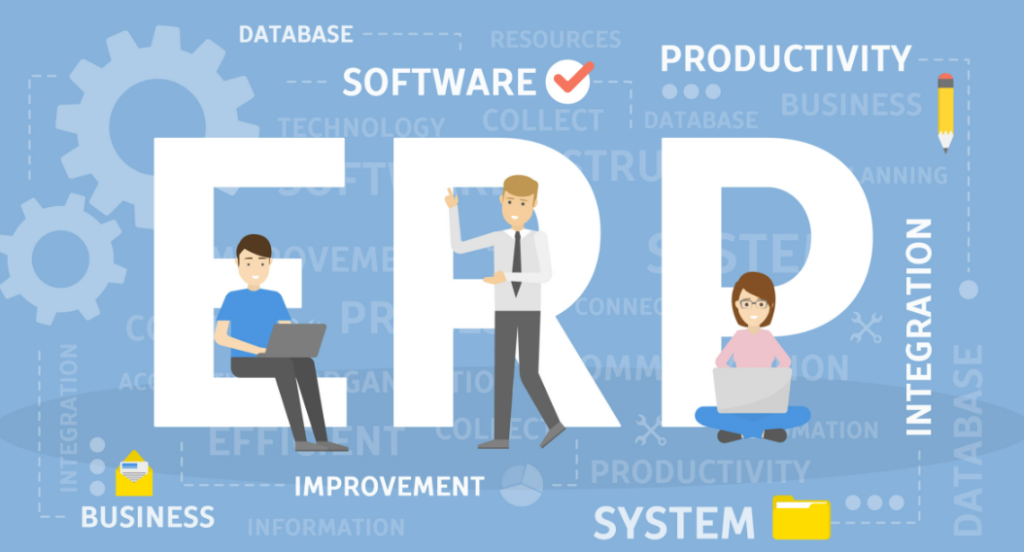
Enterprise resource planning software (ERPs)
Enterprise resource planning software is the most common type of business software developed by internal and external software development teams for very specific needs and users. ERPs are used to manage normal day-to-day activities and usually include several tools and software tailored to every need such as procurement, accounting, scheduling, project management, etc.
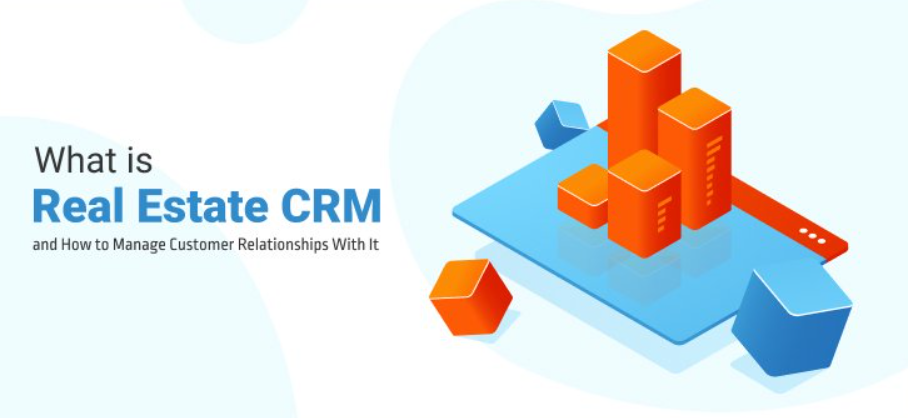
Customer relationship management software (CRM)
CRMs are also very common in the bespoke business software category as every business has a unique way of communicating with customers. Customer relationship management software is used to manage your interaction with customers to streamline communication and nurture positive relationships with them. You can design a CRM that caters to your specific customer-facing activities as a way of providing value to your customers.
Business Process automation software
There are many things or activities you can automate with the help of software in a business which is why business process automation software exists. This category of software is a great candidate for custom designs that solve very specific and unique challenges. For instance, a trucking company could develop software that automates the process of recording the freight bill of lading for each trip.
Marketing and Sales Automation Software
Marketing /sales automation is another area where businesses can gain a competitive advantage by investing in highly specialized cutting-edge software solutions. You stand to gain a lot as a business by developing custom marketing and sales solutions that enhance your campaigns and make your sales process more streamlined.
Is Software Development A Good Business?
The global business software industry continues to grow each year as demand increases for sophisticated solutions that solve ever-changing business challenges. By 2021, the global business software industry was estimated to be worth just over 400 billion dollars and expected to increase in the coming years. What this means is that software development is a good business because where there is demand, there is money to be made.
What Is the Standard Business Software Development Process?
While organizations or individual developers tend to adopt different processes and approaches, software development usually involves the following activities:
Problem identification and definition
Software conceptualization and design
Software coding or programming- implementation
Software testing and verification
Software deployment or integration
Software Maintenance
Let’s take a more detailed look at each of the above activities from a general software development process for clarity and to help you understand the value of software development efforts for your business.
Problem Identification and Definition
The very first step in a typical software development process is problem identification and definition also known as requirements analysis and it is one of the most phases in any project. As the name suggests, problem identification and definition primarily involve identifying a need or business challenge that can be solved with software and documenting it in a structured way for analysis and presentation.
For a software development project to be successful, the problem identification and definition phases must be done correctly so that the needs of all stakeholders are captured, analyzed, and included in the design of the software solution. You’ll find that stakeholders in most software projects tend to have conflicting requirements and demands that must be captured in this phase.
For instance, target users for an ERP system may want a system that allows them to use their own devices to access company resources while working from home. Normally, such needs conflict with organizational data policies and controls but can be accommodated in the design of the ERP with strict access controls, logging, VPN access, or mac address whitelisting and filtering.
The problem identification and definition phase of a software project is usually facilitated with the use of primary and secondary research, analysis, and presentation using software engineering tools like use case diagrams, flowcharts, as well as standard software engineering language.
A software problem identification and definition phase can be deemed successful if it has the following qualitative and quantitative outcomes:
Qualitative outcomes
Well-documented requirements capturing every stakeholder’s needs and preferences
The documented requirement should be represented in a way that makes them actionable/implementable e.g. by use of use cases and user journey diagrams.
The requirements should be relevant to the business problem at hand
They should be testable and easy to validate
They should provide a sufficient level of detail about the problem to aid the design process.
They should be easily traceable to the source- e.g. audit team, for better design validation
Quantitative outcomes
List and description of system stakeholders- target users, system owners, customers, etc.
Functional and non-functional requirements
Architectural requirements- how the software should be structured and target system architecture.
Behavioral requirements
Performance requirements
Design specification
Specific business or organizational requirements – the intended user of the software in a business setting, etc.
A lot of time and effort is usually spent in the software requirements and definition phase because the findings or insights gathered affect the rest of the software development process. If the wrong requirements are captured, then it is likely that the software developed will have no use for the target user or customers. Ideally, the requirements gathering and definition phase should be handled by systems analysts, trained systems designers, and researchers.
Software conceptualization and design
The second phase in a typical software development process (methodology aside) involves software conceptualization and design. In this phase, a team consisting of designers, systems analysts, DevOps engineers, developers, and other stakeholders convert documented requirements into conceptual and technical designs.
Software designs are usually in the form of flowcharts, user journey maps, charts, wireframes, and other technical diagrams used in software design. To be useful, these designs and concepts should be done in a way that reflects the problem as described in the requirements but is structured enough to be able to be converted into code for computer processors.
Software coding or programming- implementation
The third and longest phase in the software development process is the implementation phase. In this phase, design concepts and diagrams are turned into code that can run in a computer system. The deliverables in the implementation phase are usually prototyped and then go on to become software used in the real world. The implementation phase is usually the longest and most tedious process but also the most important.
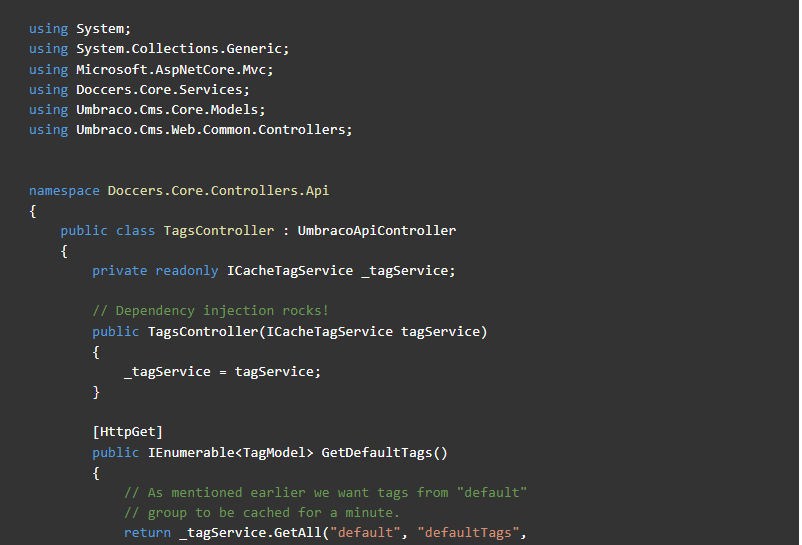
Implementation can be done in many ways using a myriad of technologies depending on the design specifications, target computing platforms and architectures, and nature of the software being produced. For instance, if you intend to use the popular SaaS model to distribute your software, then you want to choose a set of web development technologies such as JavaScript, Node, Microsoft ASP.NET Core Blazor, etc.
Over eighty percent of resources in software development are normally dedicated to software development. You’ll need to find both experienced and entry-level coders who are either full-stack, backend, and frontend or in DevOps to develop your software.
Of course, the size and scale of your software project also determine the number of coders involved. It is possible to develop a good application with small teams consisting of five or fewer coders and designers. While starting, it is advisable to keep the size of your development team small and probably hire remotely to save on costs and time.
Software testing and verification
Software testing and verification come after coding/implementation or are done concurrently with implementation in an iterative manner depending on the software development methodology used. For instance, Agile methodologies require testing done iteratively and concurrently with coding to hasten and streamline the entire process.
Software testing and verification, as the name suggests, typically involves subjecting developed software components to a range of qualitative tests to determine if they work as intended. Testing and verification are usually done on prototypes to allow for refinements to be done before the software is shipped to the end user. The aim is to eliminate as many bugs as possible in the prototyping phase.
Software deployment or integration
Software deployment and integration is usually the penultimate phase in a typical software development phase assuming we are using a waterfall method (it may come early in other methodologies. In this phase, software that is ready to be shipped and used in the real world is installed on the target platforms and made to work with existing systems using APIs, runtime environments, etc.
The type of deployment and integration you choose for your software project usually depends on the initial design specification which captured users’ needs. For instance, if you intended for the software to be accessed online using the SaaS model, then you will need to deploy it on a web server in the cloud built and managed by you.
Software Maintenance
Finally, every software that is in use will need to be maintained by a professional to keep it up to date, secure, and compatible with other systems. Software maintenance is a continuous process and may involve many things depending on the type of software and how it is used. For instance, you may need to design and code updated components to cater to changing user needs based on the feedback and direct requests you get from them.
What Is the Most Popular Programming Language for Software Development?
JavaScript remains the most popular programming language because of its versatility and the number of tools, frameworks, and community behind it. It came first ahead of Python in the 2021 Stack Overflow developer survey as the most commonly used programming language. JavaScript is used to develop all kinds of applications made to run on the web.
All in all, there is a lot to gain from developing custom software or investing in cutting-edge business solutions as a business or reseller. The good thing is that there is plenty of expertise out there to develop any type of software you may need. All you need to do is find your ideal developer and you will be on your way.
Blazor and Razor have a healthy following in the web UI dev community, especially among developers who primarily work within .NET Core. However, the confusion between these two can be off-putting for some developers, especially beginners.
This post discusses the similarities and differences between Blazor framework and Razor; both are part of Microsoft’s free and open source .NET Core development platform. We also discuss where these two technologies merge and how you will likely use them in your projects.
What Is C# Blazor And Razor?
Introduced in 2018, Blazor is a modern web development framework from Microsoft used to develop server-side and client-side web interfaces using C# as the primary language. You can use Blazor to develop fast interfaces that run on the server or entirely on the client’s browser with Web Assembly (WASM) open standards. Blazor can also be used to build progressive offline applications.
Blazor is seen as the next step in Microsoft’s web development plan because it combines the versatility and reliability of ASP .NET Core with modern web technologies such as Web Assembly. Many modern applications built within .NET Core will likely use Blazor. We’ll detail Blazor’s structure and how you can use it in your projects later.
On the other hand, Razor is the default page-based Web UI technology in ASP .NET Core. On its own, Razor is more of a templating engine you can use mainly to build fast, lightweight, and dynamic web pages. Razor has its own syntax, which is basically C# combined with HTML markup and CSS.
Note to beginner devs: There is some confusion regarding these two technologies mainly because Razor pages and syntax are also used within the Blazor framework to build server-side or client-side UI elements. The word “Blazor” is a combination of the terms browser and Razor, which alludes to the fact that Blazor can execute Razor views or web UI on the browser.
Razor Pages in ASP. Net Core Explained- How to Use It
Razor is one of the more established server-side web UI technologies within the ASP .NET Core web development framework. It is the best solution for building simple or lightweight server-rendered web UI’s with C# where the focus is on the page’s appearance and individual elements. For instance, you can use Razor to build a single-page user registration interface with CRUD functionality.
One interesting and often confusing thing about Razor is that it is used present in other web frameworks within ASP.NET Core. You will encounter Razor it ASP.NET Core MVC, Blazor, Xamarin, Mono, and other places. However, Microsoft made it possible to construct pages and views with Razor independent of the other frameworks.
Tip: To avoid confusion, it’s advisable to choose just one web UI technology within ASP.NET Core and run with it to the end. For instance, do not start using Blazor and later switch to the MVC framework on the same project unless you have a very good reason. Start with Razor for learning purposes, then move on to other project types
When to Use Razor Pages
You Are Building server-side web UI– As an independent templating engine, Razor is primarily used to build web UI’s that are rendered from the server side. You can also use it inside an MVC application on the webserver to produce HTML and CSS dynamically.
You are Building frequently updated web UI– Server-side web UI’s built using Razor are meant to be dynamic or frequently updated, much like what you could do with a content management system (CMS). Creating your dynamic web Ui with Razor allows you to control the design, features, behavior, updates, configuration options, speed, etc.
You are building Cross-platform Web UIs– Being part of ASP.NET Core, any interfaces or pages you create with Razor can be used on the web and across all computing platforms (Windows, Linux, Mac, and mobile). Razor is the preferred templating engine for progressive ASP .NET Core apps and hybrid applications that use an embedded WebView.
You are learning ASP.NET Core– According to Microsoft, building plain razor pages is the easiest way to start building web UIs within .NET Core because of the syntax and simplified application structure. Of course, you will also find it easier to start working on complex projects in Blazor or ASP. NET core MVC.
You have experience with Web Forms – Razor is the replacement web UI technology within ASP .NET, the now discontinued web forms previously used in the ASP .NET framework. You’ll be able to do almost everything you could and more with web forms using Razor markup.
You prioritize speed and performance– Razor produces lightweight, performance-oriented server-side pages that load fast on any device. The fact that the UI elements are loaded from the web server also means that you can target any device with low processing power and memory.
You are working with secure resources- Razor separates application logic from the UI, allowing you to create secure applications. You’ll use Razor markup to create your UI, but the application logic will be implemented using C# or another backend technology. Communication between the client and the server will be done using a real-time messaging framework like SignalR or through an API.
To create simple static pages within ASP .NET – If all you want to do is create a normal non-interactive website with a series of related pages and forms, Razor is the best option for you. You can build your entire website with Razor markup on the server side and deploy it on a normal hosting service.
When Not to Use Razor Pages
You will see Razor in all the web development frameworks or project types within ASP. Net Core. With this in mind, there aren’t any specific instances where you will need to avoid using it on projects. However, it’s important to note that Razor, as an independent technology, cannot be used to create client-side web UI without Blazor.
Blazor in .NET Core Explained- How And When To Use It
Blazor is a new web UI framework inside ASP.NET Core used to build fast server-side and client-side applications. Blazor has two deployment models:
Blazor Server-Side
You can use .NET Core Blazor to create server-side web UI. In this app model, your entire app is hosted and executed on a remote web server, and the user-browser only receives rendered UI elements in HTML and CSS format. Communication between the client and the server is handled through SignalR to enable real-time web functionality. The SignalR library is part of ASP.NET Core and is free and open source.
Examples of Applications You can create with Blazor server-side include social networks, GPS apps, live blogs, gaming apps, and e-commerce applications. All these apps require a constant connection to the web server for real-time updates. SignalR enables fast data uploads and downloads between the client and the server to make app UI updates faster and more fluid.
Blazor Client-Side
Blazor can also be used to create client-side web UI using web assembly. A web application developed using Blazor web assembly executes on the user’s browser, and HTML and CSS are generated automatically. Blazor WebAssembly applications are meant to be interactive to support user actions such as clicking and moving items. For example, you could develop a photo editing web application UI using Blazor WebAssembly. However, Blazor Wasm is not recommended for security-sensitive apps.
Components in Blazor
A .NET Core Blazor web UI project is divided into C# classes or components, allowing the app to be split into independent elements consisting of C# code and HTML markup. Components in .NET Core Razor are Razor pages customized to match the framework’s rules. This means developers familiar with Razor or the MVC can easily develop within Blazor.
Build Hybrid applications with Blazor
One advantage Blazor has over Razor is that you can use it to create hybrid or progressive web applications that can be installed on desktops and mobile devices. Hybrid applications developed using Blazor use an embedded browser and can run offline.
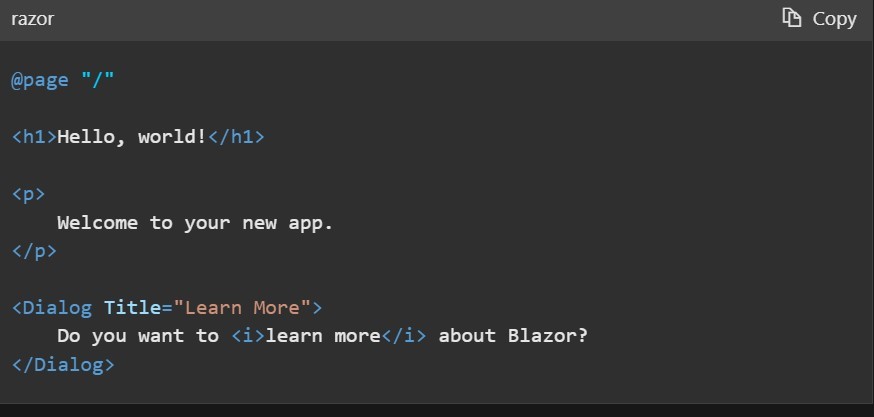
Razor Pages and Blazor Examples
Here is a simple beginner-friendly tutorial demonstrating how to build a simple web UI.
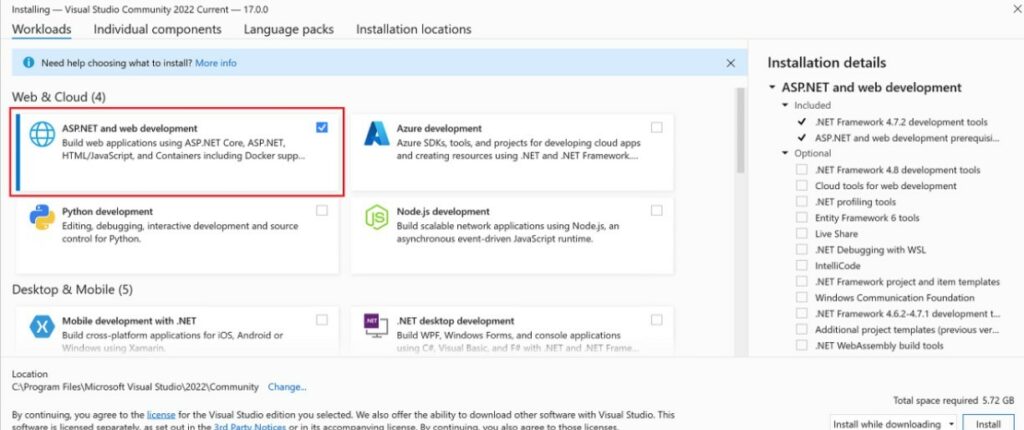
Important: Once downloaded and installed, ensure you install the ASP. NET and web development workload inside Visual Studio 2022.
You can also opt to use a text editor like VS Code and install the .NET Core 6.0 SDK and C# for Visual Studio code extension separately. However, this option can be confusing for beginners unfamiliar with .NET Core.
A web browser- Your development computer should have a web browser to test your Razor application.
In addition to these tools, you’ll need a basic understanding of C#, developing with .NET core, and working knowledge of HTML and CSS.
Creating your First Razor Application
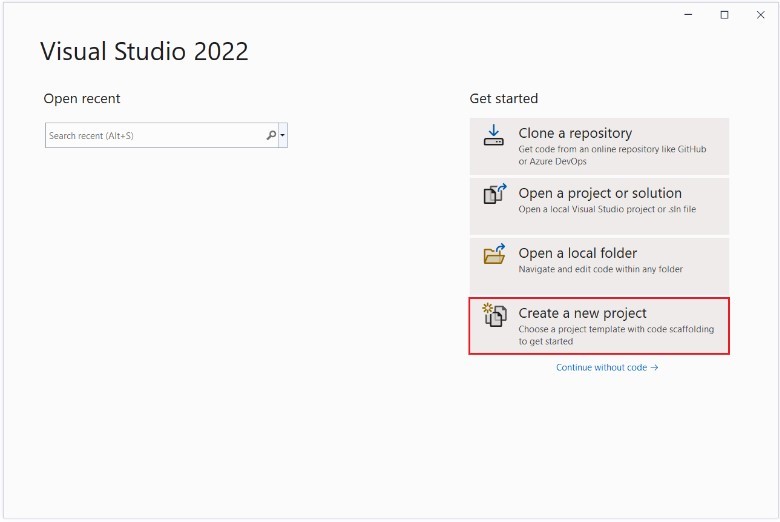
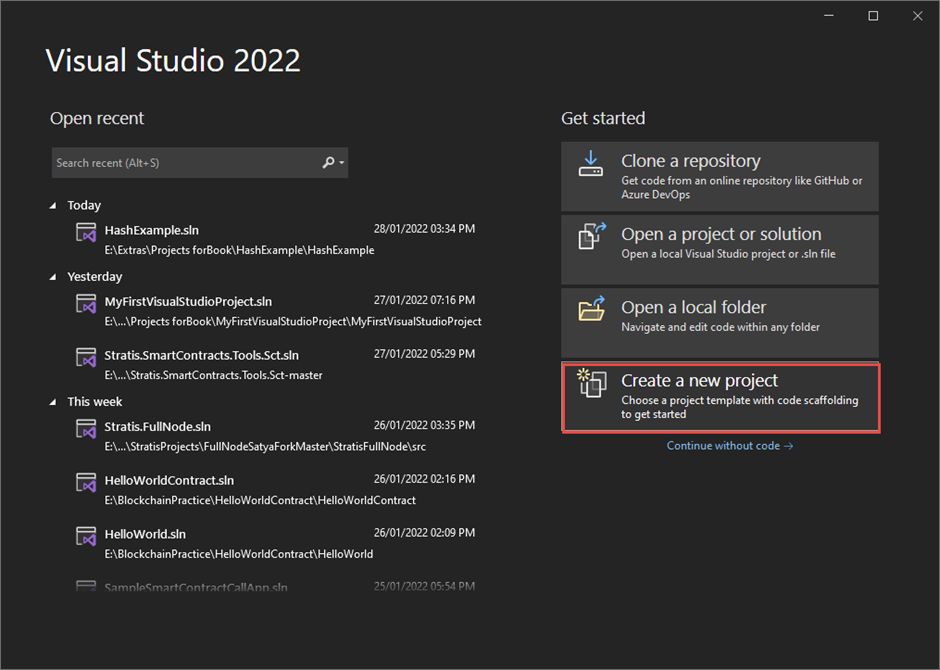
Step 1: Launch Visual Studio 2022. On the “Get Started” column, click on the last tab that says “Create a new project.”
Step 2: In the open dialog, click on the option “ASP.NET Core Web App” and click Next.
Step 3: The next dialog box allows you to configure your Razor web application. In the “project name” text box, enter “MyFirstRazor.” You can change the location where your project will be stored or leave it as default, then click next to go to the next step.
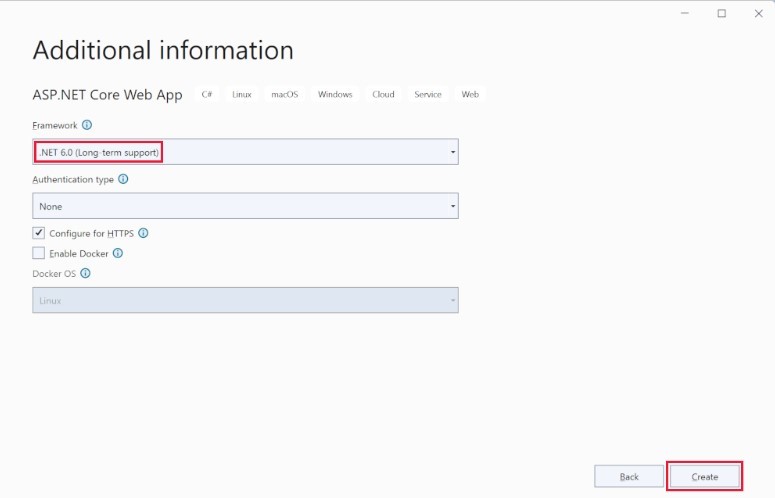
Step 4: The next dialog box allows you to choose your target framework and other details. Under “framework”, choose .NET 6.0(Long term support). Check the box that says “Configure for HTTPS” and click create to create your first Razor pages app.
Step 5: Your Razor app project will be created, and you’ll be able to view its various components on the solutions explorer pane on the left of your IDEs interface. Most of the files are autogenerated by the IDE and are not meant to be edited or moved.
Last Step: Test Run – To check that your app was properly configured and ready for the web, locate it on the solutions explorer pane, click on it, then click run.
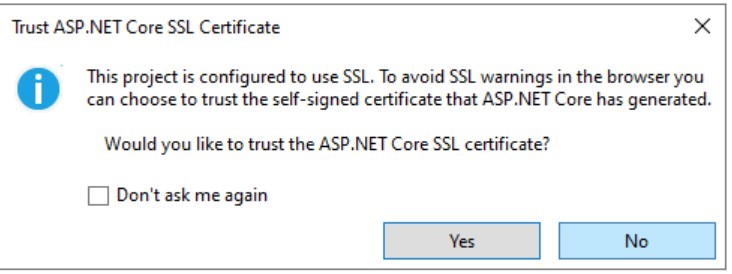
Click yes on the information box informing you about the SSL certificate to allow the ASP.NET auto-generated SSL certificate to be used while testing in a live browser.
Click yes in the next security warning box to continue to the next step. The new app will be launched on your default browser, but it will display a black page for now.
Next Steps: Take time to learn how the Razor project folder is structured and how you can customize your application using C# and HTML markup.
Create Your First App with Blazor
Step 1: Launch Visual Studio and create a new project, then choose “new Blazor app” in the next dialog box.
Step 2: Configure your project, give it a name, then click next.
Step 3: Choose “Blazor WebAssembly App” in the next dialog box and click create.
Step 4: Locate the new component in the project folder and enter the following code.
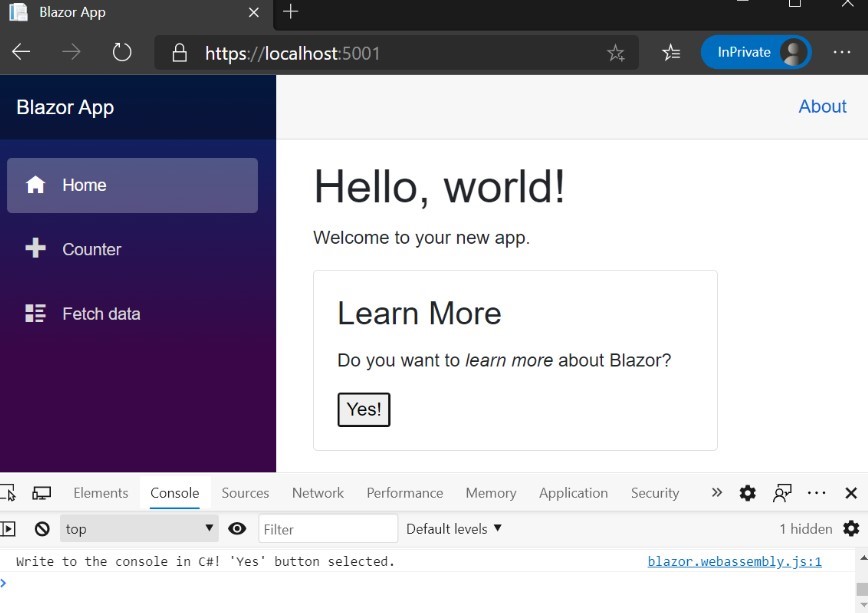
Run the project by pressing F5 and your keyboard, and you will see the following output on your default browser.
Can We Use C# Both for Server-Side and Client-Side Development?
C# is used across all project types within .NET Core. You can use it to create server-side applications inside .NET Core Standard, .NET Razor Pages, .NET Core MVC, and .NET Core Blazor. It’s the default programming language in .NET Core and can be used to create any application. C# Is free and open source.
All in all, both Blazor and Razor are solid web UI development technologies under the .NET Core family. The two can be used to create modern web UIs for web applications that are fast, secure, and reliable. New developers tend to lean towards Blazor because it has a better deployment model and is easier to learn than Razor. Hire a developer today to build fast, future-proof web applications with Blazor and Razor.
For as long as web applications have been around, full-stack developers have had to work with different sets of technologies for the front and backend. For instance, a developer would use something like Angular for the frontend and Express.js for the backend. Microsoft aimed to change this approach by unifying web app development with the release of .NET Core Blazor back in 2018.
What is .NET Core Blazor?
.NET core blazor is a relatively new open source web development framework by Microsoft used to develop interactive web apps using C# inside NET Core with the help of web assembly. Its’ biggest selling point is that it unifies the development of the backend and frontend by using one C# codebase.
You can use C# in .NET core to develop web applications but the front is still rendered as HTML and CSS for cross-browser support. You can also build cross-platform hybrid desktop and mobile applications using Blazor with access to all the libraries and components inside .NET Core.
.NET core Blazor is a great web app development framework for developers who are not keen on using multiple JavaScript frameworks or PHP with HTML and CSS to build their app. It’s also the preferred web development framework for devs who are already familiar with Microsoft’s .NET Core development platform as they use it to transition into web development without learning JavaScript or PHP.
5 Unique .NET Core Blazor Characteristics
What makes Blazor different from all the other web development frameworks out there? .NET Core Blazor has the following characteristics:
1. NET Core Blazor Uses C#
Blazor was created to bring the power, versatility, reliability, and speed of .NET Core C# into web development. C# is the primary programming language you will be using in Blazor to build client-side web UI and app logic. Since C# is not web a language, browser compatibility or the processing of Blazor web UI elements is achieved using web assembly (Wasm) leveraging open web standards.
Web assembly (Wasm) is a relatively new web format/standard used to render web pages on the browser via a binary instruction format. It was designed as a high-speed compilation target for all types of programming languages. Using Wasm means browsers don’t need extra plugins to run web applications written in non-web languages such as C# and c++.
You don’t even have to worry about Web assembly implementation with Blazor because it automates most things to enable faster web app development and easy deployment. You can transition from developing application logic to deploying your interactive interface without any actual coding involved.
C# is already an established programming language with many libraries and a big community of developers using it for both simple and complex projects. It was therefore a wise move by Microsoft to bring it into web development as it unlocks so many possibilities. You will also love using it inside Blazor If you have already developed with .NET Core and know your way around it.
2. .NET Core Blazor Has Two App Hosting Models
.NET Core Blazor allows you to choose how your app will be hosted and UI elements delivered to the client because it has two hosting models. The first hosting model uses the Blazor server and it is where your web app is executed remotely so that the client browser receives a rendered web UI. Server-side hosting is very common for complex Azure cloud web apps with tons of features and components.
The second hosting model is simply referred to as Blazor WebAssembly and it is where the app is executed directly on the client’s browser using WebAssembly. It is the most preferred and easiest hosting model for web light web apps and static pages that can be handled on the client side. As a beginner, you will likely use this model to build your first apps starting with a simple Blazor WebAssembly template.
Your ASP .NET Core Blazor app is divided into components which are C# classes that will represent every element or asset within your application. The division into C# components is a design style that most ASP .NET C# developers are very familiar with and appreciate. It allows you to subdivide your app into small, independent Razor components that combine C# and HTML.
.NET Blazor’s razor markup components render into the client browser in a more efficient fashion using a render tree unlike JavaScript or other frontend languages that interface with the DOM. There are several advantages to this unique approach, the most notable one being faster rendering and less memory use on the client side. You’ll notice that properly constructed razor pages have native-app-like speed.
4. Blazor Is part of Dot NET Core
The beauty about Blazor is that it is part of .NET Core and implements the same. NET standards. .NET Core is already a powerful and feature-rich cross-platform development platform with thousands of .NET standard and third-party libraries which you can access to build your Blazor app. This alone gives blazor an edge over other frameworks because of the immense power of cross-shared libraries within .NET Core.
5. You can use Blazor to build Hybrid Applications
Blazor can also be used to build hybrid applications that run natively and render web elements within an embedded web browser. Hybrid apps leverage the power of native offline resource access on desktops and mobiles and the versatility of web technologies. These hybrid apps use .NET Multi-platform App (MAUI), Windows Presentation format (WPF), and Windows forms.
.NET Core Blazor Additional Features and Capabilities
Blazor has the following additional features and capabilities that make your work as a developer easier:
Support for GraphQL with libraries like GraphQL.NET and Hot Chocolate
Support for lazy loading for enhanced app performance
Native support for virtualization using virtualize components
Native support for hot reload for app performance
Realtime web functionality using SignalR– the open source library
Experimental support for auto-generating JavaScript components
Interop with JavaScript allowing you to call Blazor components from JavaScript
Does Blazor Have a Future?
Not only does .NET Core Blazor have a future in web development but it will likely become the standard for developing web applications and hybrid apps within .NET Core. Every new release of .NET Core and ASP.NET comes with new and exciting improvements to the Blazor framework that .NET developers can be excited about. The fact that it is open source and free makes Blazor future-proof as it already has a community around it.
Is Blazor Still Experimental?
No, Blazor has been around since 2018 and is now an official open source web development framework within .NET Core. Many developers are already using ASP. Net Core and C# are using Blazor to build WebAssembly apps, native apps, and server-only apps using Blazor. A sizable Blazor community of developers and contributors exists on GitHub.
What are the advantages of Blazor?
Some of the notable advantages of using Blazor as your primary development framework include:
Blazor is fast- blazor is by far, one of the best web development frameworks out there when it comes to speed. Blazor is notably faster than JavaScript as it uses the .NET runtime on top of the browser.
Familiar Syntax– Programmers familiar with C# code will love using Blazor because it maintains the same familiar syntax.
Cross-platform and Open Source- Blazor is part of ASP.NET Core which is cross-platform and open source.
Vast library– You will get access to the large .NET Core library with streamlined dependency injection. Compatible libraries or dependencies can be imported easily as independent NuGet packages.
Blazor supports offline apps– Wasm apps can still run inside the user’s browser even when they are offline.
Reliable development environment- You will be using Visual Studio and .NET Core which form a reliable and stable development environment with features for debugging, testing, deploying, intelli-sense, and lots of templates to make your work easier.
.Net Core Blazor Example
Here is an example Hello World Blazor WebAssembly app using .NET Core blazor. You’ll need to install Visual Studio and the .NET Core SDK with at least .NET core 3.1 installed
Start a new project inside Visual Studio and select the new Blazor app in the categories
Fill in the configuration details in the next section
In the next section, select Blazor Web Assembly App and click create.
Type the following code in the new component created and run it
Here is what you will see on your browser window
What Is Blazor’s Target Browser Support?
Blazor apps can run on any browser that supports the open web standards. All major browsers (Edge, Chrome, Firefox, Opera, Brave) and even the smaller ones support open web standards. Also, note that Blazor C# apps are rendered as HTML and CSS on the browser.
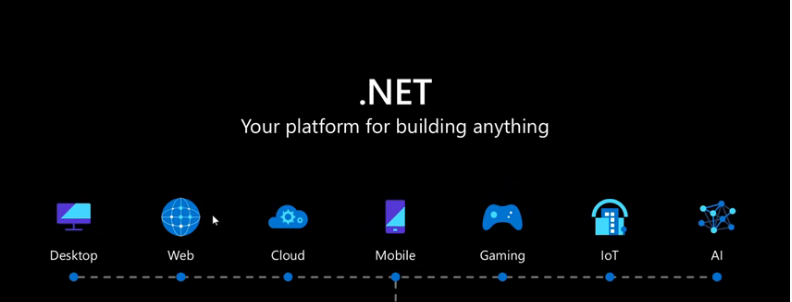
Microsoft’s .NET core platform is used to develop both complex and simple solutions running on the cloud, mobile, IoT devices, all computer platforms and pretty much every other architecture out there. As a developer, you are likely going to interact with it in some way even when you are using other technologies to develop.
In this tutorial, we provide a quick and easy-to-digest overview of .NET Core from a developer perspective. It should serve as a resource for both beginners and senior devs who want to get into .NET development but have little time to go through lengthy documentation.
What Is .NET Core?
.NET Core – pronounced as dotnet core- is an open-source, general-purpose, software development platform developed by Microsoft. It was first released in 2016 alongside Visual Studio 2015 as a versatile cross-platform alternative to .NET Framework. Its popularity has shot up in recent years coming third in the 2021 Stackoverflow developer survey -other frameworks and libraries category.
The main characteristics of .NET Core and its successor .NET 5 from a developer perspective include:
.NET Core is Cross Platform
Unlike many of Microsoft’s previous development frameworks and tools, .NET core was created as a cross-platform development platform. This means you can run it on Windows, Mac OS, and Linux, and the software you develop can be run on all three platforms. You can also use the platform to develop and test mobile applications, microservices, web applications, etc.
.NET being cross-platform also means that developers can use essential Microsoft development tools on all platforms. For instance, there are Mac and Linux versions of Visual Studio- Microsoft’s popular IDE. The same goes for the CLI, libraries, mobile dev tools, and server development architecture.
.NET Core was a departure from previous development frameworks that were fragmented and native to Windows. Microsoft, on the release of this new platform, said that they aimed for NET to become a versatile dev platform with a single code base that would allow all developers to build solutions for all OS platforms.
.NET Core is Open Source
Microsoft chose to open source .NET core and its subsequent versions because they understood the importance of having a community around it and the growing need for transparency. For these reasons, .NET Core’s codebase is available as an open package on Github published under the Apache 2 and MIT licenses.
NET Core’s runtime source code, its SDK repo, the Rosyln language compiler, and ASP.NET Core repository source codes are available on the Github project page managed by the .NET foundation. The implications from a developer perspective are that anyone can contribute to changes, participate in code reviews, and access all design documents relating to the entire .NET Core framework.
Microsoft says that open sourcing their entire development platform has had many positive implications like making the product attractive to developers and enabling faster implementation. It also makes it easy for both new and experienced developers to understand how .NET Core works and its overall direction as a development platform.
Cross-Architecture Uniformity
A developer working on solutions in any architecture (x64, x 86, or ARM) can execute uniformly across all of them and expect the same behavior from their app. This is a great improvement from previous development environments that required a lot of work to port solutions across architecture and, often, it led to inconsistent behavior and bugs that had to be addressed with updates.
Deployment Flexibility
Unlike previous dev environments by Microsoft, .NET Core allows flexible code deployment on top of the framework or as a self-contained, independent deployment. Deploying on top of the framework means the app is lightweight and relies on natively installed .NET Core deployment components. On the other hand, an independent or standalone deployment allows you to pack every single .NET deployment component within your app bundle.
Backward and Horizontal Compatibility
.NET Core and its successor maintain very good backward compatibility with the old .NET framework as well as horizontal compatibility with other frameworks such as Xamarin and Mono. Implementing components or functionality from these frameworks is smooth and transparent.
Fully-Featured Command Line interface
In line with other popular and modern software development platforms like Node, .NET Core came with a very powerful CLI toolset you can use to install packages/dependencies, build, test, execute, and deploy .NET Core applications. The CLI is also cross-platform and open source like the rest of the platform and comes bundled with the .NET Core install.
It is a Modular Development Platform
One of the biggest complaints developers had with the old .NET framework was how heavy it was because it came as a single package mostly full of unwanted components. To improve on that, Microsoft decided to make .NET Core modular. The platform is delivered in an agile fashion using a set of independent and fine-grained NuGet packages.
As a developer, this modularity allows you to update or deploy only the packages and components that are relevant to your project. NET Core consists of the .NET runtime (CoreCLR), the SDK and compiler, the .NET app host, and the fundamental libraries. Nuget assembly packages are spread across the entire development platform and can be removed or integrated at will depending on the nature of the project or desired dev environment.
Setting Up .NET Core
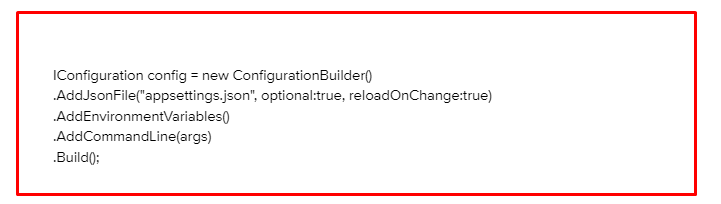
ASP .net core leverages the provider model, a convenient design pattern, to load configuration value/key pairs from different sources while exposing them to developers as one configuration object. This allows them to grasp a configuration key such as ConnectionString with a single line of code regardless of source. The configuration API in .net core console applications isn’t available by default. Here are the Nuget packages to obtain the Configuration API and initiate the providers as ASP core web page apps.
Design a .Net Core Console Application
Access .Net core via Visual Studio 2017, then navigate to Console Application and change its name to, for example, “myconsolecore application.” incorporate a JSON configuration file (appsettings.json) as the premier configuration keys source. Ensure the “Copy to Output Directory” is configured to “copy always” for the newly incorporated JSON file to facilitate its publication with the application. Replace the appsettings.json file with:
Doing so configures the property “message” to the “Hey” value.
Write Code
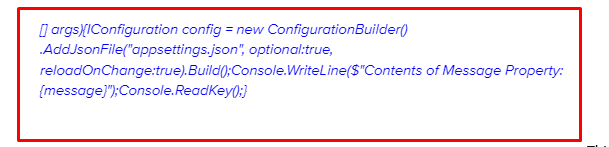
Before updating the application, include the Nuget package (install-package Microsoft.Extensions.Configuration.Json) with the provider necessary for loading JSON configuration files. Replace the core method contents with static Main void string:
This loads the appsettings.json file in the configuration object and removes each value and property. Suppose your defined property (Message) is configured to the value of “Hey from appsettings.json.” The WritrLine procedure will exhibit the Message property’s value on the console window. Running the application generates the “you have loaded configuration data successfully from the appsettings.json file.”
Incorporate Environment Variables
You can do so by installing the Nuget Package below:
Now update the Core method to incorporate the provider, as seen below.
This loads environment variables in the configuration item and facilitates container or cross-platform deployments. Further, since environment variables are installed after the appsettings.json file, possible duplicate keys replace the values from the appsettings.json file.
Include the “Message” environment variable to counter the Message property from the Project Properties section in appsettings.json. Some developers replace the initially configured Message key in the appsettings.json file with environment variable contents.
Include Command Line Arguments
Add the Command Line Arguments configuration provider. The first step involves installing the right Nuget package.
Load the new provider by updating the Core method, as seen below.
Incorporate a command line argument to amend the project properties. This will replace the Message property with the “Hello from args” string. The “Message” property was configured three times: in the appsettings.json file, as an environment variable, and as a command line argument. The final loaded provider conquers possible conflicts.
.Net core incorporated a flexible and robust configuration API in the ASP Core application by default. Adding some Nuget packages to a .Net Core application provides similar flexibility. The chronology of adding the configuration builder is crucial because the last incorporated counters previous values. Applying this in the above-mentioned order gives you a configuration environment similar to what’s available in ASP core applications.
Installing .NET Core SDK
.NET comprises the SDK and the runtime. The SDK facilitates the creation of .NET libraries and applications, while the runtime helps run a .NET application. There are two forms of supported releases.
The standard term support (STS) or long-term support (LTS). While these releases have the same quality, the length of support is different. LTS releases acquire free patches and support for three years, while STS gets the same for 18 months. You can install .NET core SDK via the Windows package manager with the winget tool.
When installing .NET system-wide, consider installing it with administrative privileges. Developers can leverage .NET SDK to create applications with .NET. After installing the .NET SDK, you won’t have to install the comparable runtimes. Run the Windows command prompt below to install .NET SDK.
Creating a New Project in .NET Core
Developers can use .NET core to create IoT, cloud, and web applications on a cross-platform environment like Linux, MacOS, and Windows. ASP.NET core also facilitates the hosting applications on modern platforms like AKS and docker.
This framework comes with inbuilt features like dependency injection. What’s more, you can enable swagger, containerization, and docker in one click. Here is a guideline to help you develop an ASP.NET core MVC web application.
Step 1: Launch Open Visual Studio
When Visual Studio launches, click “Continue Without Code.”
Proceed to the Visual Studio Menu and click on “File” then “New Project.”
Click on the “New Project” option.
Step 2: Select the Project Template
You can select any of the following project templates.
ASP.NET Core Web App (Model-View-Controller): Do you want your web application to feature Model, View, Controller? This template will be ideal.
ASP.NET Core Web App: Developers planning to create web applications with Razor pages but without Model, View, Controller should use this template.
In this case, the developer chose the ASP.NET Core Web App (Model, View, Controller) template.
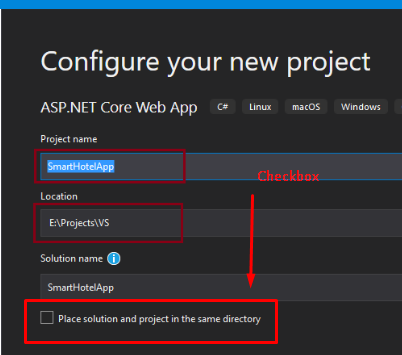
Step 3: Describe the Name of Your Project and its Location
Launch the project configuration window to reveal the options below.
Project name: Write your preferred project name
Location: Choose where the project files will be saved on your computer’s hard drive
Solution name: This is an auto-defined option based on your project name. Change it accordingly. You can also define the available checkbox, as seen below. Once you do so, the project files and solution file will be saved in that folder.
Step 4 – Define the Target Framework
Select the latest target framework. Here, we’ll use .NET 5, but you can still pick any other, depending on your needs. Skip the additional details, then click the create option to create your ASP.NET Core MVC web application.
Understanding the Project Structure
Here is the default structure of your project.
The wwwroot Folder
The default wwwroot folder stores static files related to your project. You can access these files programmatically through a relative path.
The Controller Folder
This folder comprises the controller sets where you write operation-based code.
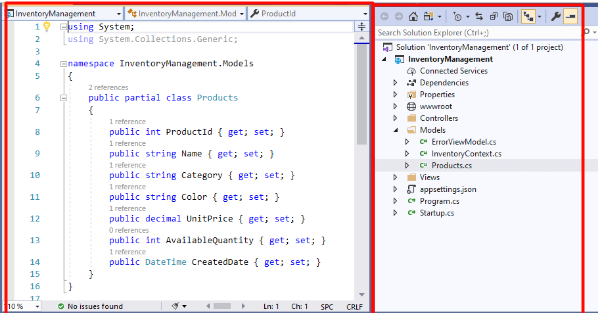
The Model Folder
Here you will find the entity or domain group. You can write models in different sections of the solution, like a folder or class library.
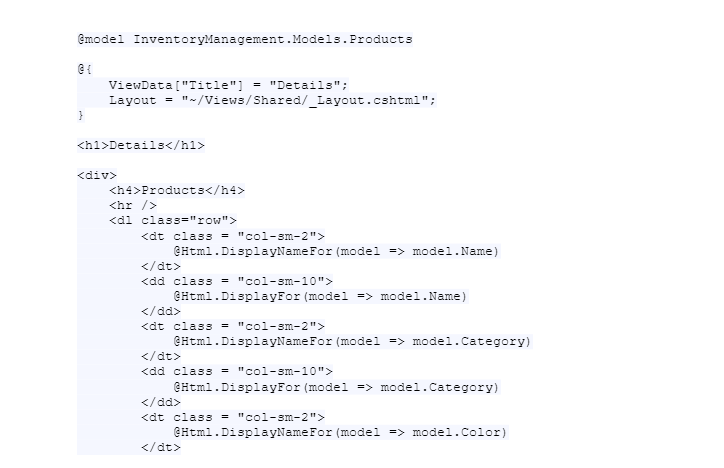
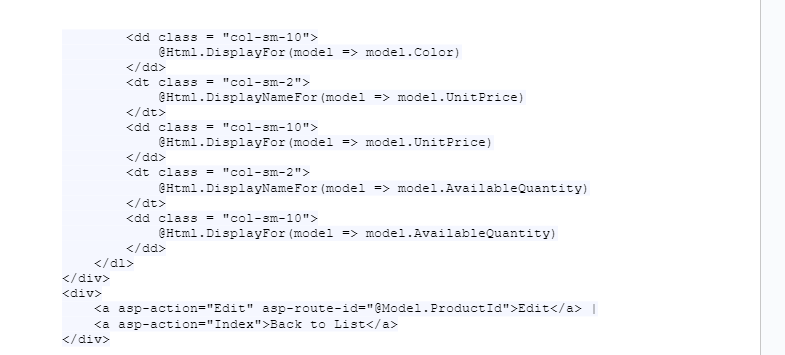
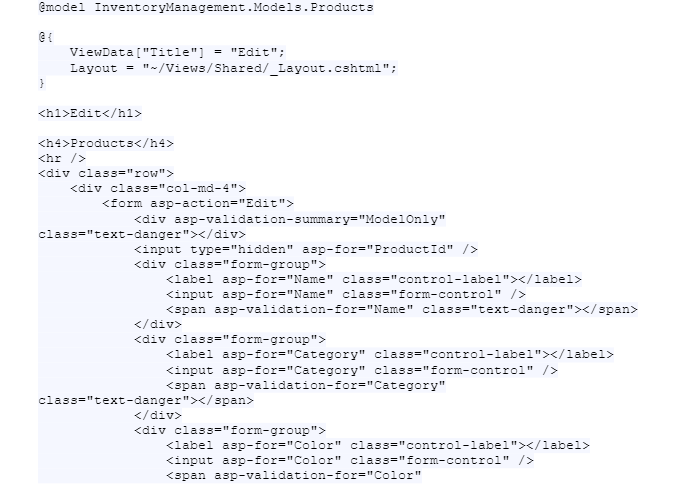
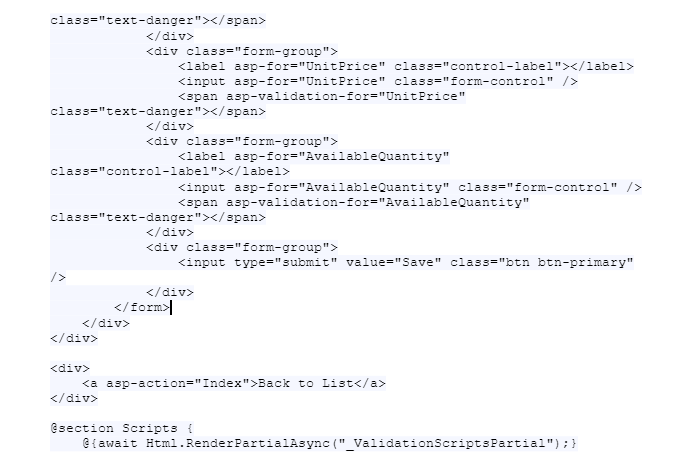
The Views Folder
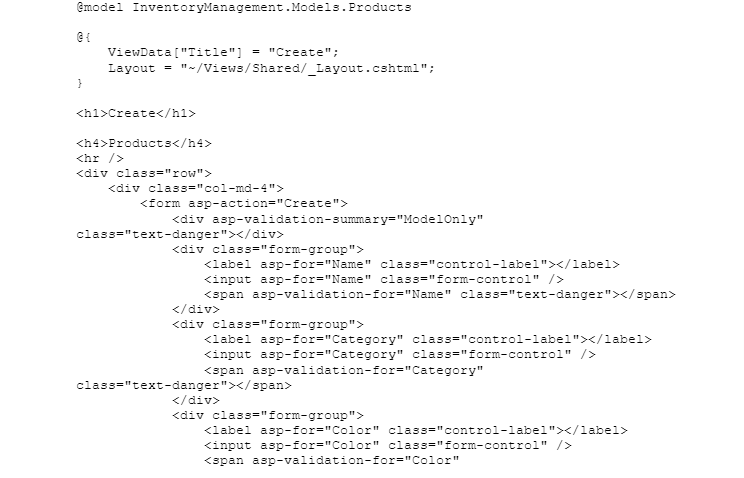
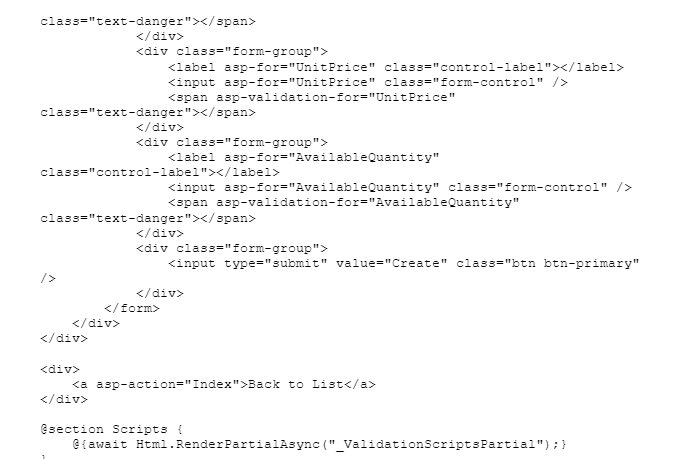
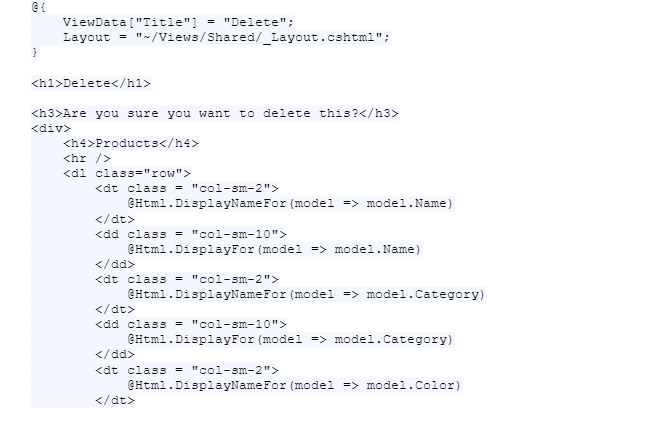
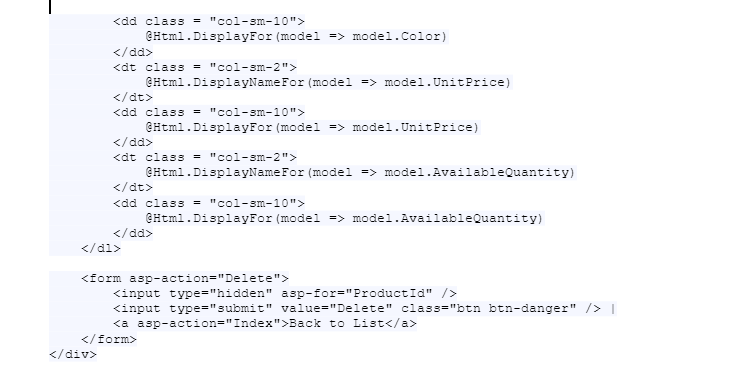
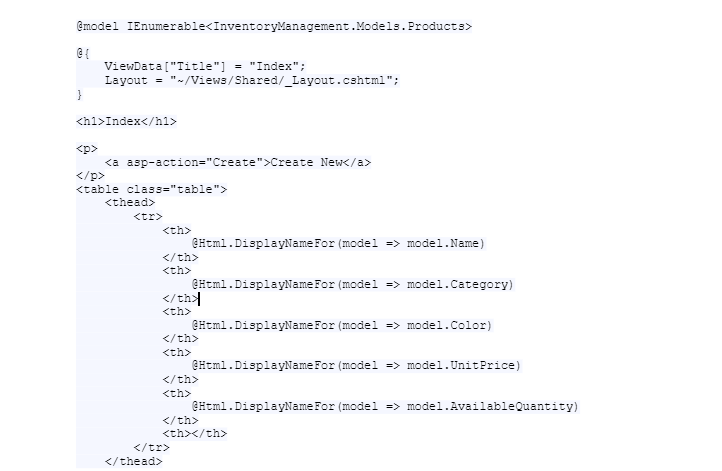
This folder contains the razor pages that facilitate user data display and acquisition.
The appsettings.json File
In this folder, you will find the secret and configuration details of your application.
Program.cs File
This marks the application’s starting point. It also creates the host enabling an application to run the app.
Startup.cs File
Leverage the Startup.cs file to set up the behavior of the application. For example, you can define the dependency injection and routes.
Developing Applications with .NET Core
When developing hybrid applications, web services, or mobile backends, developers can use the ASP.NET Core. This framework helps you create feature-dense applications to solve different problems. Let’s discuss how to develop a web application using ASP.Net.
Creating a Web Application with ASP.NET Core
To create a web application, you’ll need Open Visual Studio 2019. Click the Create a new project box option to launch the “Create a new project” window.
In that window are various .NET Core 3.1 application templates. Are you a beginner who wants to develop a simple application? Select the ASP.NET Core web application template > click next. That will reveal the “Configure your new project” window, where you can choose your project name and define where you will develop your application.
Under the solution name for your application, give it your preferred name. For example, “beginnercorewebapplication.”
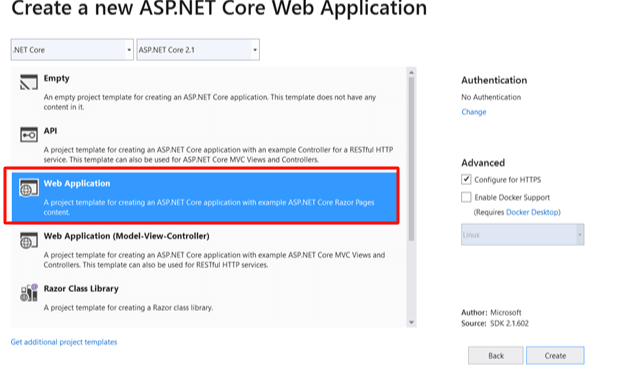
Now click create to launch the “Create a new ASP.NET Core web application” option. Select the suitable ASP.Core Web application template. The options here are; web application, API, Empty, Angular, or Web Application (MVC). Our developer here chose the empty template. Remember to choose the suitable ASP.Net Core and .NET core versions.
Uncheck the checkboxes under the Advanced section and click the create option to create a new .NET core web application in Open Visual Studio 2019. Allow Visual Studio to restore packages in the project. During the restoring process, Visual Studio will automatically add, update, and delete any configured dependencies like NuGet packages in the application.
Below is the application’s folder and file structure.
Run the .NET Core Application
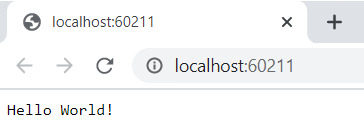
To run this application, you can either press Ctrl + F5 without Debug or F5 with Debug. You can opt to click IIS Express. Either of these options will launch the browser and display the output below.
The “Hello World” output is from the Configure technique of the Startup class, which is available in the Startup.cs file Open Startup.cs file. You’ll need to change the “Hello World” output before rerunning the application.
Project Templates in ASP.NET Core Application
Developers can use different templates when creating their .NET core web applications. Let’s discuss them in detail below.
Empty Project Template
This project template is, as the name suggests, empty. Choose this template if you’re a DIY developer who prefers doing everything from scratch.
Web Application (Model-View-Controller) Template
Do you want a template with everything you need to develop a .NET Core MVC Web Application? Besides creating Models, Views, and Controller folders, this template incorporates web-specific components like Layout files, CSS files, and JavaScript. These components facilitate the development of a web application.
API Template
If you want to create an ASP.NET Core RESTful HTTP service, select the API template. While it features the Controllers folder, other web-specific components like view, JavaScript, CSS, and layout files are mission. Why is that so? It’s because an API doesn’t feature any user interface. The views and models folders are also missing in the API template because they aren’t necessary for an API.
Web Application Template
This template leverages the new Razor Pages framework for developing web applications. Developers can use new Razor pages to ease and enhance the productivity of page-focused scenarios. Suppose you want to create a web application without the entire complexity of ASP.NET MVC. This template should be your go-to option.
Angular, React.js, React.js, and Redux
You can develop an ASP.Net core web app jointly with Redux and React, React, or Angular.
Creating a Console Application with .NET Core
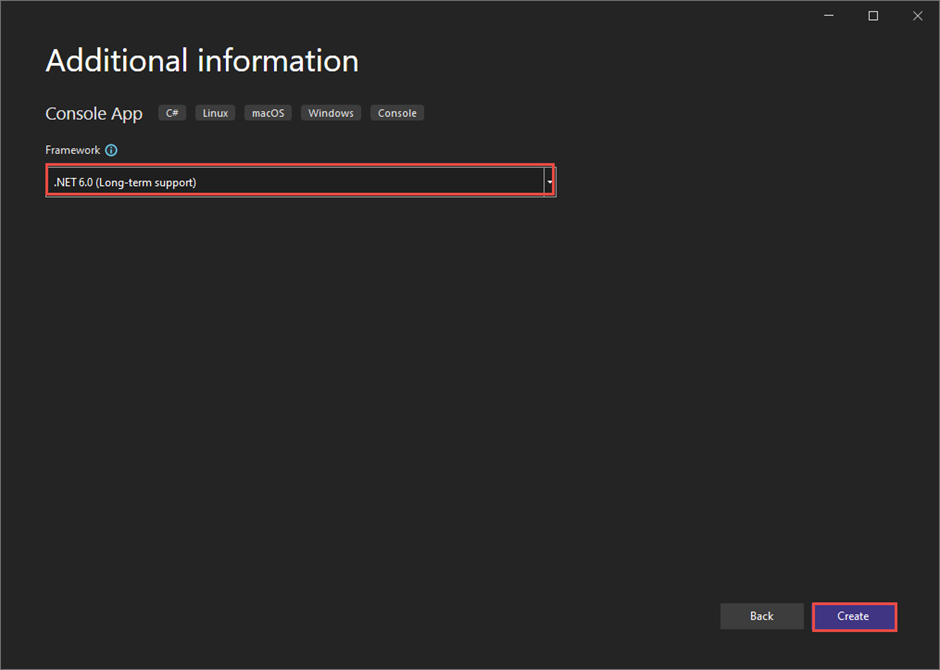
In this project, we’ll use .NET 6, a highly improved framework regarding code quality, security, and performance. It offers one of the smoothest developer experiences and long-term support. Are you a beginner in the development world? Begin your .NET learning process with Visual Studio IDE and an advanced framework. Here is a guideline to help you develop a console application using .NET 6 and .NET 5.
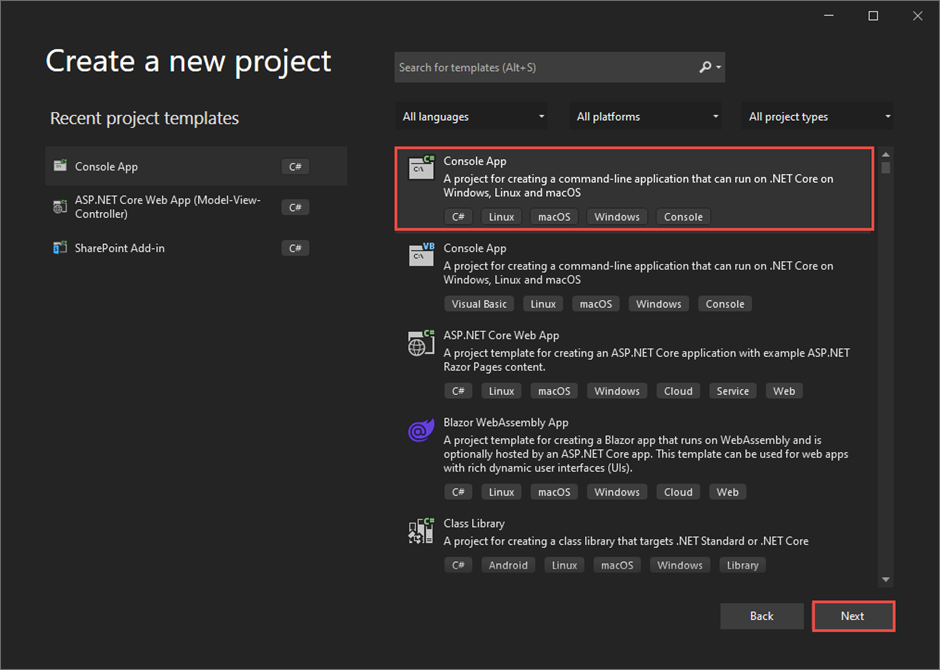
Step 1: Launch Visual Studio 2022 and click “Create a new project”
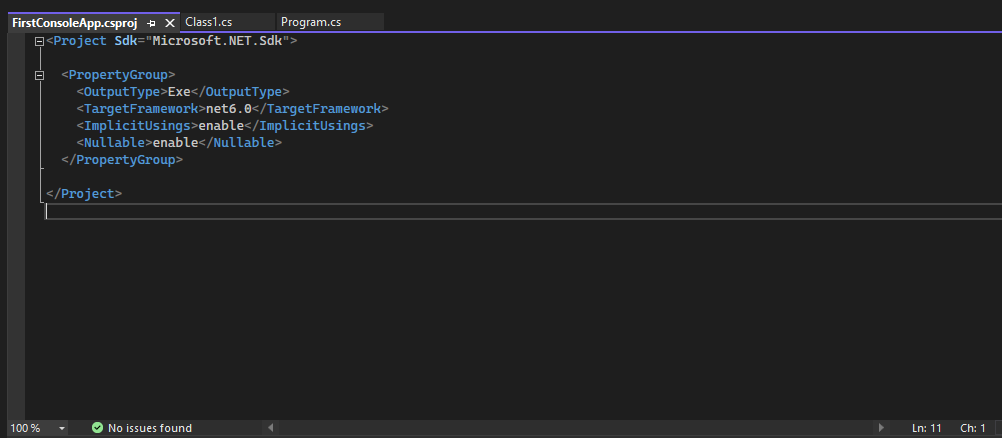
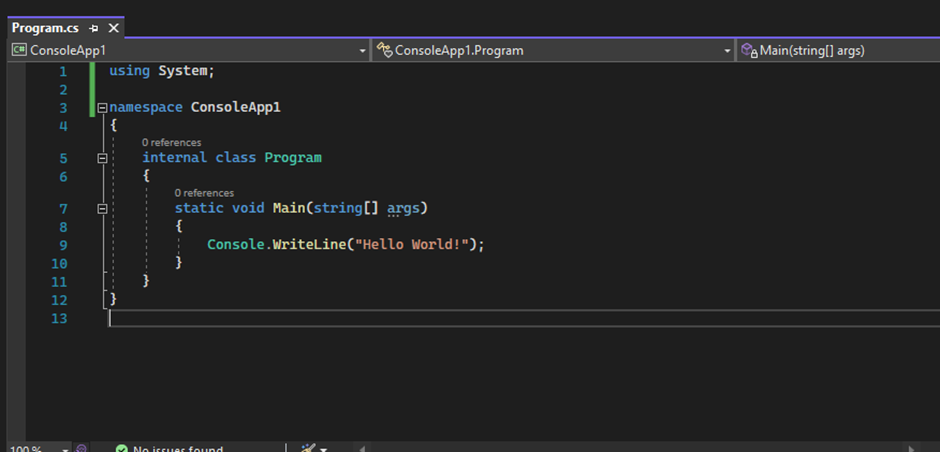
Here is the default Program.cs file. You can also see the project.csproj file
// See https://aka.ms/new-console-template for more information Console.WriteLine(“Hello, World!”);
Click “Start without debugging” to compile and run the program. If you love quick fixes, you can also press Ctrl+F5.
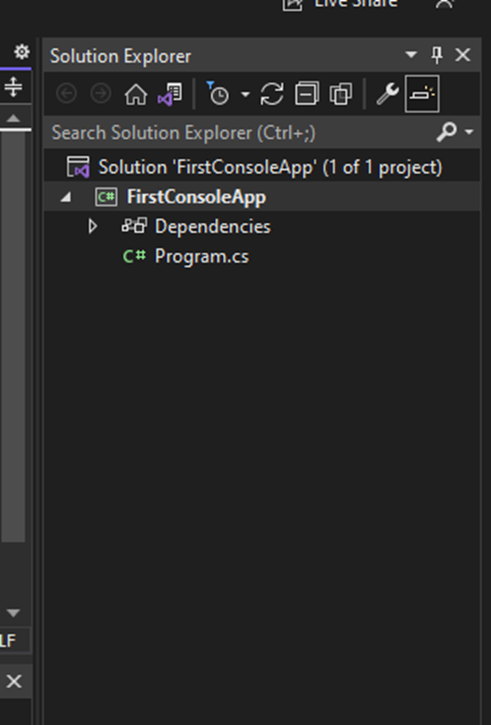
The “FirstConsoleApp.exe” will appear in the defined folder location of your project. You can run the .exe file, which shows the “Hello, World” prompt.
Creating the Project with .NET 5
Follow the above steps apart from step 4, where you should choose .Net 5.
The Program.cs of the console app with .NET 5 is as you can see below.
.NET6 vs. .NET 5
The Program.cs of .NET 5 features; Using the system, Main method, and Namespace
class keyword. These options are unavailable in .NET 6.
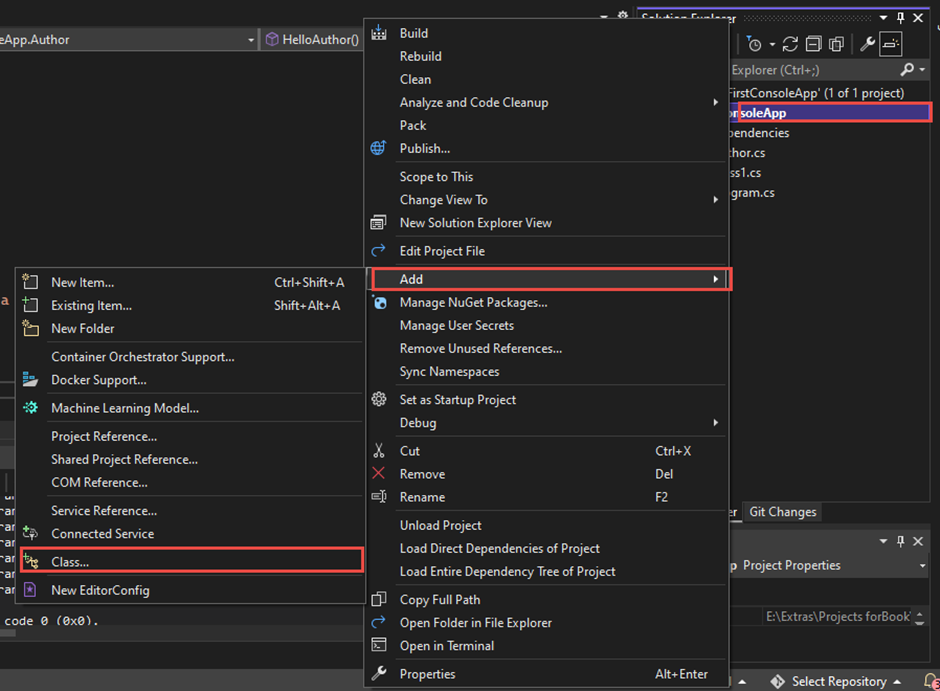
Developers can extend their .NET 6 console applications by incorporating a new class. Here is the procedure.
Right-click the project, click add to reveal Class, then click ass.
Give your class a suitable name. You want to create a public void method – Sum in your class.
Use the following code:
The detailed code of your class.cs is;
namespace FirstConsoleApp { internal class Class1 { public void Sum() { int a = 5; int b = 6; int Sum = a + b; Console.WriteLine(“Sum : {0}”, Sum); } } }
If you’ve not yet noticed, this class contains:
The namespace
Using statements (by default)
Internal Class
Program.cs doesn’t come with these features.
Understanding the Call Sum() Method
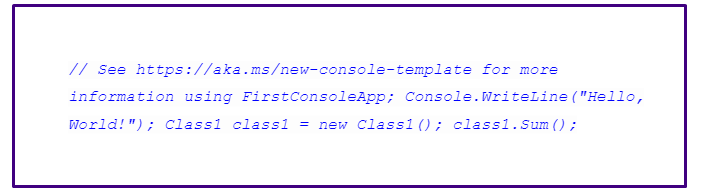
In Program.cs class, you will call the sum method of your class.cs. Here, you’ll need to add namespace: with FirstConsoleApp using the code below.
using FirstConsoleApp; //need to call method from Class1 Class1 class1 = new Class1(); class1.Sum();
Should you run the app now, you’ll get Sum:11 in the console.
The detailed Program.cs code is:
Creating a desktop application with .NET Core
The tools below are necessary for developing a web application using .NET Core. You need some basic understanding of C# and .NET development. Developers can use C# to build application samples.
SQL Server 2008 Express Edition
Visual Studio 2019 Community Edition
SQL Server Management Studio
Developers can download these tools free of charge. Let’s create this application with the .NET framework version 4.7.2.
Step 1: Build the Data Source
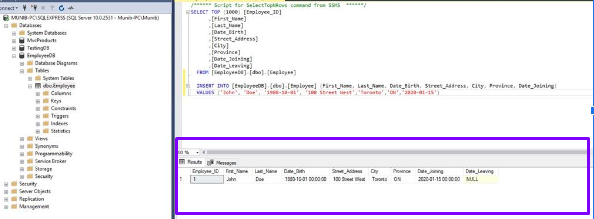
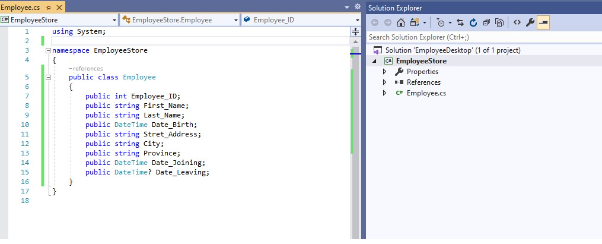
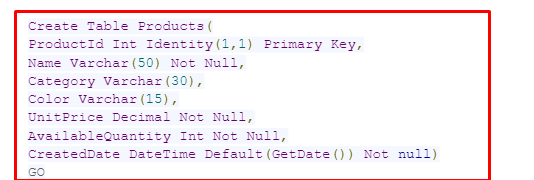
This is the location where you’ll be saving all your data. You can name it based on your preferences, but in our case, we’ll call it “EmployeeDB” and incorporate an “Employee” table, as shown in the image below.
The “Employee_ID section will be the identity field where you store the unique key value for your employee records. Your complete Employee table should appear as seen below.
Now, add one record to your table. Below is an example.
Your data store is now complete.
The Data Access Layer
Start your project by building a solution, which you can call “EmployeeDesktop.” This project will host the “Employee” class, where employee records are stored. You must keep the class in a separate project. You’ll use it independently from your data access project across multiple projects.
Your complete employee class will appear as follows.
This image displays the “Employee” table in the database.
Now build the data access layer project. You’ll need to incorporate a new project, in this case, “EmployeeDAL” into the solution.
Once your project is ready, add the “EmployeeDAL” class and “IEmployeeDAL” interface. Doing so will complete your data access layer plus its related components. Now part of your solution is ready. It will help you read data from the data store and keep it in a .NET class matching the records in the data store.
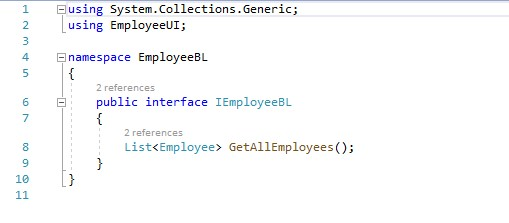
Creating the Business Logic Layer
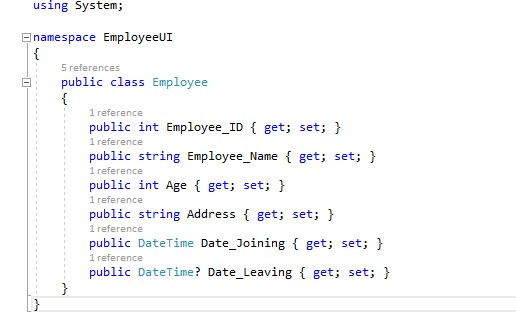
In this next project, you’ll build the business logic layer, which we’ll call the “EmployeeBL.” It will host the “IEmployeeBL” interface and the “EmployeeBL” class responsible for implementing the interface. Further, you’ll build a new class, “Employee” into a new project called the “EmployeeUI.”
This is the employee category that will appear on the user interface. The business logic layer reads data from the data access layer. It then applies business logic before displaying it on the front end. Suppose you’re a beginner, the examples below can be a good starting point.
It’s not complex; you will need to add an employee’s first and last name to get their name. Input the address details to fetch the address and use the birth value read data from the database to display the employee’s age.
At this point, you’ve created three main components of your solution. You have the data store, data access layer, and business logic layer. Let’s proceed to the next step of the project.
The Presentation Layer or Front End
This part marks the final stages of your project. Here, you will display the data you have read from the data store, and converted into the user’s preferred format.
At this point, you’ve created three main components of your solution. You have the data store, data access layer, and business logic layer. Let’s proceed to the next step of the project.
The Presentation Layer or Front End
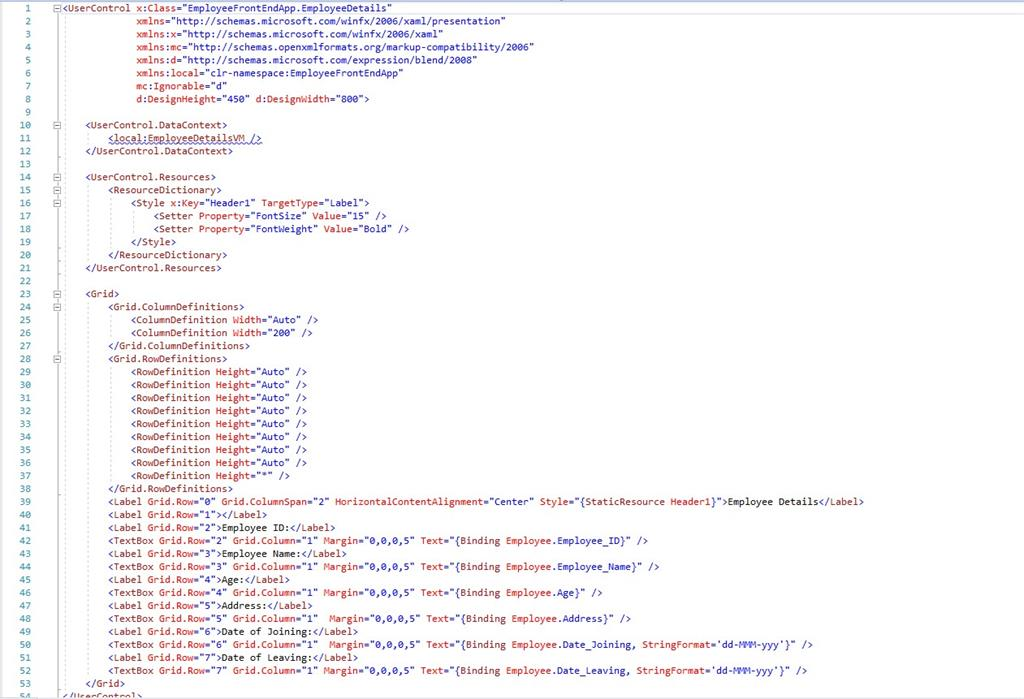
This part marks the final stages of your project. Here, you will display the data you have read from the data store, and converted into the user’s preferred format. Fo this application you’ll be using a Windows Presentation Foundation (WPF) application with the MVVM design pattern.
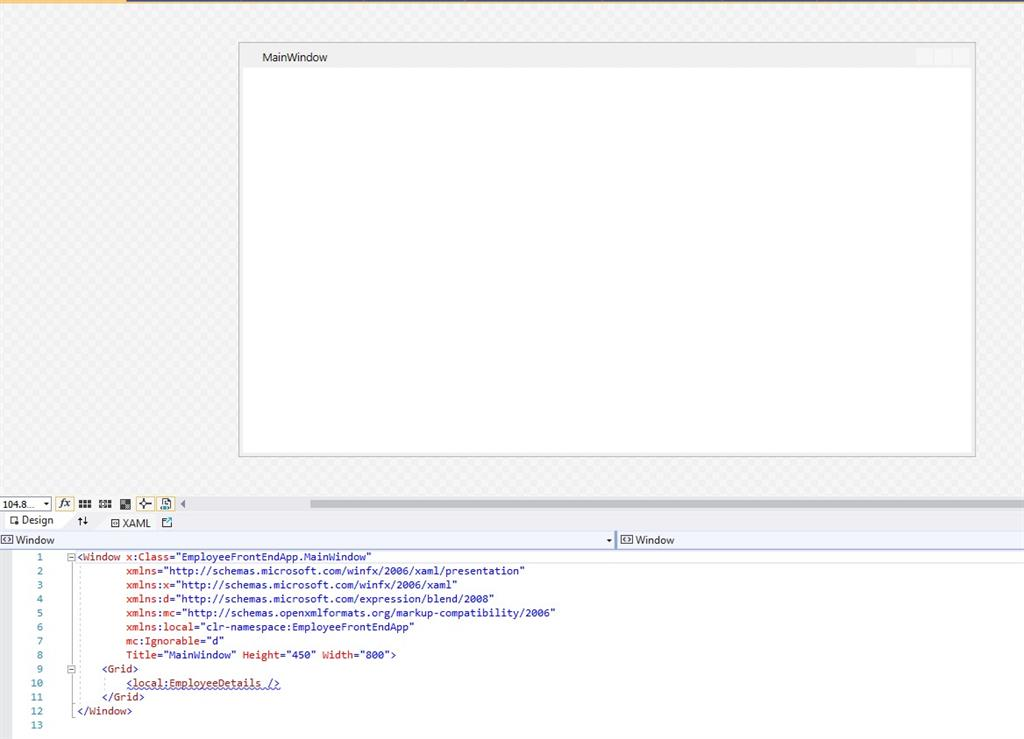
You can get comprehensive details about the pattern from online sources. The final step involves creating an “EmployeeFrontEndApp” WPF application, containing the “EmployeeDetails.xaml” view, plus the “EmployeeDetailsVM.cs” view model, as shown in the images below.
To complete the process, incorporate the Employee view in the Main Window, as seen in the image below.
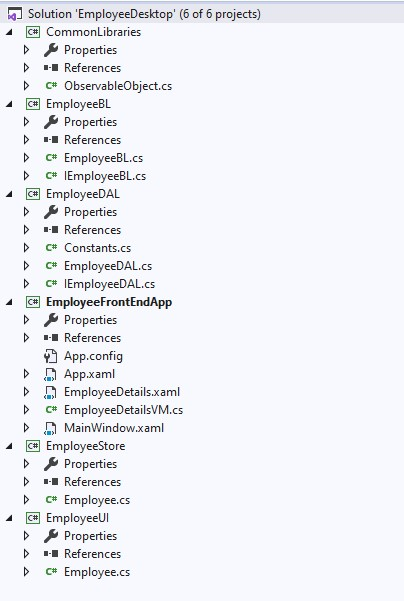
Here is the completed structure of your solution.
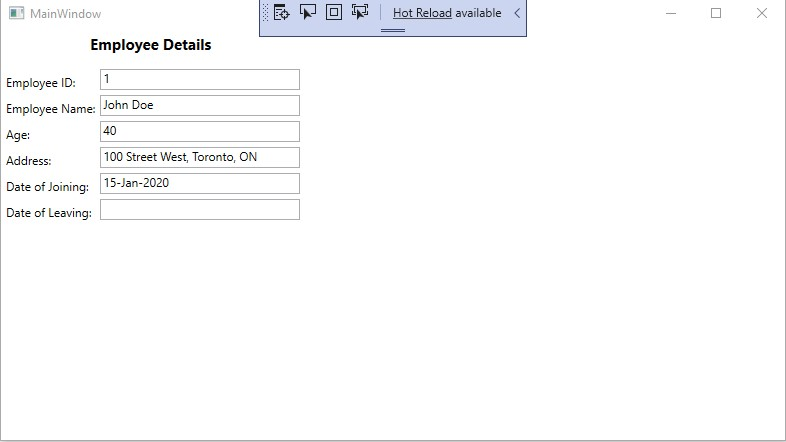
Time to develop and run the application, as seen below.
There you have your complete functional .NET desktop application, covering all architecture layers. You can expand it to incorporate new features. For example, adding a new employee. You can also delete an employee who no longer works for the company from the data source.
Creating a Mobile Application with Xamarin
Start by selecting your preferred development environment. You can opt for:
Visual Studio 2019
Visual Studio 2022
Visual Studio for Mac
Use this sample to ease the process, alongside the following steps.
Select file, click new and navigate to project. You can also click on “Create new project” option.
Find “Xamarin, or navigate to the Project type menu and select Mobile. Choose the Mobile App (Xamarin.Forms) project type.
Select your preferred project name.
Click the “Blank” project type and check iOS and Android.
Wait for the NuGet packages to restore. You’ll get a “Restore completed” alert in the status bar.
Here are some points to remember when executing this project.
If you’re using the New Visual Studio 2022, chances are the Android SDKs won’t be installed. You may get a prompt to install a more recent Android SDK.
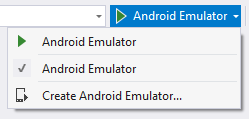
New Visual Studio 2022 installations aren’t configured with an Android emulator. To create the Android Emulator, click on the dropdown menu below to activate the emulator creation screen.
Choose the default settings from the emulator creation screen, then click the create option.
After creating the emulator, the system will take you back to the “Device Manager” window. Visual Studio 2022 will now display the new emulator’s name on the Debug button.
Click the Debug option to build and deploy your application to the Android emulator.
Debugging and Testing .NET Core Applications
Debug and Release are inbuilt in .Net configurations. Developers can debug with the debug build configuration and use the Release configuration to facilitate final release distribution. How does the Debug configuration work?
A program collates with full symbolic debug data without optimization. The relationship between generated instructions and source code can be complex, explaining why optimization will hinder debugging.
A program’s release configuration lacks significant debug data and is entirely optimized. Visual Studio Code launch settings leverages the Debug build configuration by default. This means developers won’t change it before debugging. Start the process by:
Launching Visual Studio Code
Opening the folder where you stored your .NET console application with Visual Studio Code.
Set a Breakpoint
A breakpoint interrupts the completion of an application temporarily before the line with the breakpoint can run.
Launch the Program.cs file
Click on the left margin of the code window to set the breakpoint along the line that shows the time, date, and name.
You can also set a breakpoint by either selecting Run > Toggle breakpoint from the menu when the line of code is checked or pressing F9.
Visual Studio Code will display a red dot along the left margin to highlight the line where the breakpoint is configured.
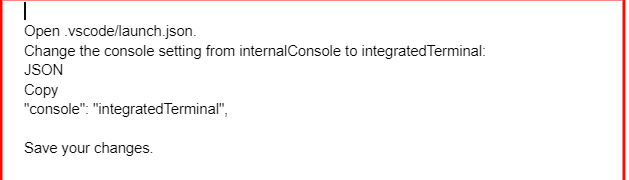
Configure for Terminal Input
The breakpoint lies right after a Console.ReadLine method call. It’s important to understand that the Debug Console won’t authorize terminal input for running a program. To manage terminal input during debugging, a developer can leverage an external terminal or the integrated terminal. The example below uses the integrated terminal.
The Debugging Process
Launch the Debug view by checking the Debugging icon located on the left side menu. Choose the green arrow located right above the pane and adjacent to .NET Core Launch (console). Developers can also press F5 to launch the program in debugging mode, or select Run > Start Debugging from the menu.
Choose the Terminal tab to reveal the “What is your name?” command. The program displays this command while waiting for a response.
To respond to the command you’ll need to enter a string at the Terminal window, before pressing “Enter”
Program execution will stop once it gets to the breakpoint and right before the Console.WriteLine technique runs.
Using Unit Testing Frameworks for .NET Core Applications
Developers can complete unit testing using three core frameworks, all of which:
Feature test runner packages to facilitate the direct running of tests from Visual Studio
Slightly differ in feature and syntax set
Have console-oriented runners capable of running tests as a section of a CI/CD
Let’s discuss these frameworks in detail.
xUnit.NET
Besides being new, this framework is quite popular among developers and the .NET Core team. When running xUnit tests, the category with the test methods is epitomized separately for each test. This enables tests to run side by side while preventing data sharing. xUnit.NET is the default option for .NET Core web applications.
NUnit
The NUnit project is the inaugural open-source and robust unit test framework for the .NET world. Today, many developers still choose it for their unit testing needs. NUnit is also ideal for embedding a runner UI and unit tests into a Windows application.
MSTest
This is a testing framework for Microsoft. Previously, MSTest was easy to run from Visual Studio, yet it was also a bad choice. Automating the tests from CI/CD build servers was difficult. However, these problems are now a thing of the past with .NET Core. However, some C# developers opine that the changes came a little to late and has been overtaken by other frameworks.
Integrate Testing with .NET Core Applications
To integrate testing using .NET Core applications, a developer will need:
A test project to accommodate and complete the tests. The test project is recommended for the System under test (SUT)
Developers use the test runner to complete tests and generate answers.
The test project generates a test web host for the “system under arrest,” while using a test server client to manage requests and responses with the SUT.
Integration tests occur in the Arrange, Act, and Assert test steps sequence:
Configuration of the SUT’s web host
Creation of a test server client to present requests to the application
Execution of the Arrange step. The application prepares a request
Execution of the Act step, where the client generates the requests and gets a response
Execution of the Assert step, which involves validation of the actual response as a fail or pass, depending on an anticipated response
Continuation of the process to facilitate the execution of all tests
Reporting of the test results
Usually, the test web host configuration differs from the application’s web host for test runs. For instance, different application settings or different database can be used for the tests. The Microsoft.AspNetCore.Mvc.Testing package either provides or manages infrastructure elements like the in-memory test server and test web host. The Microsoft.AspNetCore.Mvc.Testing package manages various tasks, as seen below.
Configuration of the content root to the SUT’s project root. This enables static views/pages and files during test execution.
Copying of the dependencies file from the SUT into the test project’s directory
Offers the WebApplicationFactory category to simplify bootstrapping of the SUT with TestServer.
The unit tests report defines configuring a test runner and test project. It also features detailed instructions on how to run recommendations and tests for naming test classes and tests. Developers should always separate unit tests from integration tests into various projects. Doing so has the following benefits:
Facilitates control over the set of tests that are run
Prevents infrastructure testing components from being incorporated into the unit tests accidentally
Deploying .NET Core Applications
Developers can deploy a .NET core application as a self-contained deployment that features .NET Core binaries and the application or as a framework-dependent deployment that has the application binaries but relies on the .NET Core’s presence at the target system.
Framework-dependent Deployment
This process involves developing, testing, and publishing the application. Developers can follow these steps:
Build the project
Incorporate the app’s source code
Develop a Debug build for the application
Deploy the app
The resulting files are stored in the “publish” directory on Unix and the “Publish” directory on Windows systems.
The publishing process generates a program database with debugging data regarding your application. The file is essential for debugging exceptions. Developers may opt to eliminate it from their application’s files. However, saving it will be useful when you need to debug and release the application build. Deploy all the application files based on your preferences. For instance, you can package them with your preferred installation package use the copy command or wrap them in a Zip file. After installation, users can leverage the dotnet command to execute the application and define the application filename.
Self-contained Deployment Without Third-party Dependencies
This process involves building the project, redesigning the csproj file, creating, testing, and publishing the application. Here, developers will only follow two steps:
Project creation
Incorporate the application’s source code
Find out whether you will need globalization invariant mode. Suppose your application is built for Linux, globalization invariant mode will help you reduce deployment size. It is ideal for non-globally aware applications that can use casing conventions, formatting conventions, string comparison, and manage the invariant culture order. Right-click on the project in “Solution Explorer” to enable invariant more. Choose “Edit SCD.vbproj or SCD.csproj” and add the following to the file:
Develop a debug build of the application by:
Choosing Build > Build solution. Developers may also gather and run the debug build of the app by choosing Debug > Start Debugging. This step allows them to identify possible problems with the application as it runs on the host platform.
Testing it on every target platform is critical. Always test the app to determine whether the lack of culture-sensitive information is appropriate for the application if you have activated globalization invariant mode. Once the debugging process is done, publish the self-contained deployment.
Publishing a .NET Core Application
Publishing an application is the concept of producing a compiled app that a server can host. .NET Core SDK manages the publishing step. To publish an app:
Navigate to the Solution Explorer, right-click on the project, and choose “publish”
Access the pick a publish target option. Choose the “folder publish option”
Set the file share or folder path
Select the publish option
Deploying a .NET Core application to Azure
Build a new project in Visual Studio. Choose the ASP.NET Core Web Application as your template.
Set up the project, adding a valid name and location, then click “Create”
Select Web Application as seen below, > “Create”
Your sample .NET Core application is now ready.
Run the application to determine its appearance so you can validate it after it’s deployed to Azure.
Access the project in the Solution Explorer and click Publish. Visual Studio will generate various code publication options.
If you’re publishing into App Service, choose App Service > Create New option > Publish.
You will be directed to a screed where you can develop your inaugural Azure App Service.
Create a new hosting plan and resource group.
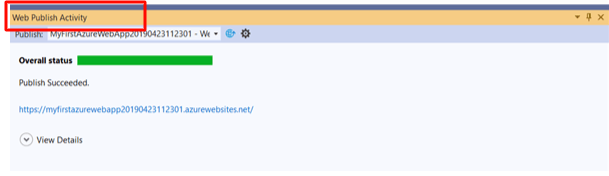
At this point, your screen will appear, as shown in the image below. Click “Create” to publish the .NET Core web app to Azure. Once published, the app will launch in the default browser.
The publishing activity will be visible in the Window shown below. As you can see, the publishing is successful.
Deploying a .NET Core Application to AWS
Before starting the deployment process, ensure that:
You have an AWS account. If you can get one affiliated with an IAM user account, the better
The AWS Toolkit for Azure DevOps is installed on an on-premises Azure DevOps server or in Azure DevOps
An AWS elastic Beanstalk app and environment
A code project for a .NET framework which you’ll publish to the AZure DevOps project
Now, build a new AZure DevOps project, then upload your .NET framework files into it. Incorporate a new pipeline to the project based on the .NET framework template, which shall generate a web deploy archive to facilitate deployment.
To incorporate the AWS elastic Beanstalk deploy application task to build definition:
Choose the “+” button at the top of the task list. You can opt to work with the panel on the right side of your screen.
Type something inside the search box and scroll through until you find the AWS Elastic Beanstalk Deploy Application task.
Choose “ADD” to incorporate to the bottom of build definition.
Click “new task” to reveal its properties
Click the new task to see its properties in the right pane.
Configuring the Task Properties
If you’ve set up your AWS credentials for the project, choose them from the drop-down list. If you haven’t, select “New” to add credentials for the task.
Configure the AWS region where the Elastic Beanstalk environment is running
Define the name you used when creating the elastic Beanstalk app
Choose the environment name affiliated with the app name
Set the deployment bundle type field to the default
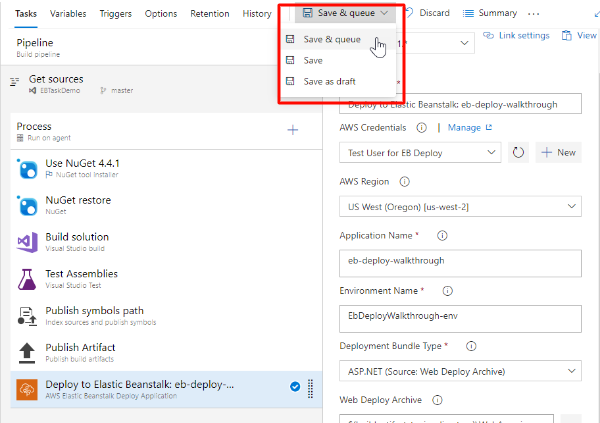
The web deploy archive is the complete path of the web deploy archive. Find this field’s value in the Build Solution task. The DesktopBuildPackageLocation argument is located in the MSBuild Arguments field. Remember, you can use the directory section of the full path in other tasks. For example, suppose the project was configured based on the above instructions. The value for the field would be “$build.artifactstagingdirectory\WebApp.zip.”
Once your new task is set up, you can run the build. Select “Save & queue” as seen below.
A log similar to the image below will appear after the build completes the running process.
Building APIs with .NET Core
ASP.NET Core supports the creation of web APIs using minimal APIs or controllers. In a web APIS, controllers are categories that emanate from ControllerBase. You’ll need basic knowledge of object-oriented programming concepts to develop API with .NET Core.
What is an API?
APIs facilitate the communication of two software components through a collection of protocols and definitions. API stands for Application Programming Interface. Application is any software with a specific function, while Interface is a contract of service between two applications. The contract determines how the applications communicate using responses and requests.
Why use .NET Core for Building APIs?
.NET Core is a versatile app development framework with cross-platform support. Developers can use the framework for different chipsets and operating systems. .NET Core is open source and platform agnostic, facilitating cross-platform and interoperability development while offering significant scalability.
Since it’s open source, .NET Core can evolve fast, enabling the identification of more applicable functions. It can also be modified to support more operating systems to enhance cross-platform support. Further, security flaws can be identified and patched. .NET Core grants developers the freedom to use different architectures, hardware, and servers.
Creating a New API Project in .NET Core
Use this method to develop a controller-based API that uses a database. Here, you’ll need the Visual Studio 2022 with web development workload and ASP.NET.
Navigate to the “File Menu” and click New > Project
Enter “Web API” in the search box
Choose the ASP.NET Core Web API template and click Next
From the “Configure your new project” name your project TodoApi and click next to reveal the “Additional information dialog.”
Confirm you’re using the .NET 7.0 framework
Check the box for “Use controllers” and uncheck “to use minimal APIs.”
Click “Create”
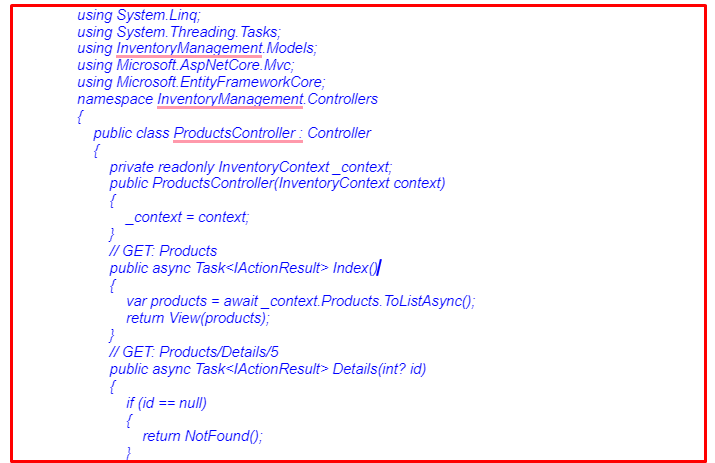
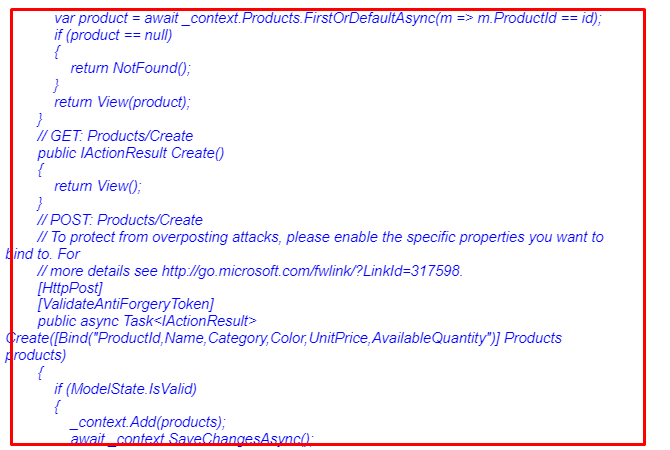
Adding Controllers and Actions to the API
The Web API controllers developers add under this section must support CRUD(Create, Read, Update, and Delete) operations. The controllers communicate with the database layer via the Entity framework. Start by deleting the Controllers/ValuesController.cs. File. It contains a sample Web API that’s unnecessary in this case.
Next, create the project. The Web API scaffolding relies on reflection to identify the model classes. As a result, it’ll need the compiled assembly.
Navigate to Solution Explorer > right-click the Controllers folder > click Add > select Controller.
At the “Add Scaffold dialog” choose “Web API 2 Controller with actions, using Entity Framework”> Click Add.
Access the “Add Controller dialog”:
Navigate to the Model class dropdown option and choose the Author class. If it’s there, confirm whether the project is built.
Select “Use async controller actions.”
Don’t change the controller name. “AuthorsController.”
Click the “+” option next to Data Context Class.
Click Add to complete the “Add Controller dialog.” This will incorporate two classes to the project:
AuthorsController, which describes a Web API controller. The controller discharged the REST API that clients use to execute CRUD operations on the author’s list.
BookServiceContext, which oversees entity objects at run time, including continuing data to the database, change tracking, and populating objects with information from a database.
Here, create the project again and follow the same steps above to incorporate an API controller for Book entities. Choose Book for model class, and BookServiceContext class for the data context class. Don’t build a new data context.
Click “Add” to add the controller.
Implementing CRUD Functionality with Entity Framework Core
Get the appropriate software in your system, as seen below.
.NET 5.0 Preview SDK 2.0
Visual Studio 2019 16.6.0 Preview 2.
SQL Server 2017
To build an ASP.NET Core web application, follow the steps we’ve previously discussed in this article.
Install the appropriate NuGet packages compatible with the SQL Server database by:
Run the “Install-Package Microsoft.EntityFrameworkCore.Tools -Version 5.0.0-preview.2.20159.4” command in the Package Manager Console. The package facilitates the creation of the model class and database context from the database. The database provider ensures the Entiry Framework Cork is compatible with SQL Server.
Develop a database and link it with the application. Ensure you have the SQL Server 2017 in your system and:
Create a new inventory (database)
Suppose this application is about a table named Products with basic features. Paste the SQL query below on the query window, then run to create the table.
Run the “Scaffold-DbContext “Server=******;Database=Inventory;Integrated Security=True” Microsoft.EntityFrameworkCore.SqlServer -OutputDir Models” scaffold prompt in the Package Manager Console. This will reverse design the database and develop the entity POCO classes and database context from tables. The scaffold command only creates POCO classes from tables with a primary key. The inventory context class and Products class will appear as shown below.
The auto-generated inventory Context class file features hard-coded database credentials in the “OnConfiguring method.”
Remove the parameterless constructor and OnConfiguring method from the context file.
Incorporate the connection string in the “appsetting.json file.”
Register the database context service on the application startup.
Incorporate the code below in the “ConfigureServices method” of your Startup file.
Execute CRUD Operations
To modify controller actions to execute CRUD operations on IventoryContext:
Incorporate Controller Action
Integrate the products controller’s constructor in the “InventoryContext”
Use the code below in place of the controller.
The code explains the actions and their purposes, as seen below:
Details: generate the product details from the products table via product ID. Suppose the product is unfound; generate a “NOT FOUND” result
Index: Generate all products from inventory and returns for viewing.
Create: Obtains product details as inputs and generates a new product in the inventory
Edit: Obtains the product details and ID as input. Suppose the product is unfound. It updates the details in the inventory.
Delete: Acquires the product ID as input, asks for confirmation, and deletes the product from inventory.
Server-side Validation
Add ModelState.IsValid check in the edit and add action. This will ensure users entered are valid based on the data validation concept included in the product’s metadata category. The Bind attribute is used in the edit and add action parameter. This facilitates binding of necessary properties from the user interface. To add view:
Create a new “Products under Views” folder
Click the “Products folder and click Add.” Choose “View and click the Razor View Empty template” Add these files:
cshtml
cshtml
cshtml
cshtml
cshtml
Use the code shown in the images below in place of what appears in the views.
Create
Delete
Details
Edit
Index
Client-side Validation
The client-side validation functions based on the rules added to the products’ metadata category with data annotation. It also shows validation messages. Worth mentioning is that this application features both client-side and server-side validation.
Run the Application
Click “Run” to view the app. A new browser tab will launch. Here, you’ll see the product listing page. However, the inventory will be empty.
Click “Create New” to incorporate new products to your inventory. That action will prompt the following screen.
Click Create but don’t fill in any data. The results will be as seen in the image below.
Input data in the sections: product name, category, unit price, color, and quantity available.
Click Create.
The page will be something like:
Click details to reveal product details.
To update product details, click “Edit.” Modify product details accordingly, then click save.
To delete a product click “Delete.” You’ll get a confirmation prompt before the product is permanently deleted from the website.
Testing the API with Postman
Developers can use Postman to facilitate API testing. Here are simple steps to go about it.
Navigate to your Postman workspace
Click the “+” symbol to launch a new tab
Input the API Endpoint in the “Enter request URL” section and choose the action type GET for the request
Click the send button
Deploying the API to Azure
Deploying API to the Azure Arc-enabled Kubernetes group broadens API management support for multiple and hybrid cloud environments. Here is how to execute the process.
Navigate to the Azure Arc-connected clusture on the Azure portal
Choose “Extensions” from the left menu > + Add > API management gateway
Choose Create
Configure the gateways extension at the “Install API Management” gateway window.
Choose the resource and subscription group for the API management instance
Choose the Gateway name and API management instance from the Gateway details. Input a Namespace scope for the extension and various replicas if the API management service tier allows it
Select the default or a different configuration for your group in Kubernetes set up
Activate monitoring to upload metrics tracking requests to backend and gateway in the Monitoring tab. If its already activated, choose an existing Log Analytics workspace.
Click Review and install > install
Conclusion
Developers can test the deployed ASP.NET Core web API in Azure from the Azure portal by launching the Test tab > Get operation > select Send.
Secure Coding with .NET Core
ASP.NET Core features various libraries and tools developers can use to secure apps like third-party identity platforms like LinkedIn, Facebook, and Twitter. It also offers inbuilt identity providers.
Overview of Common Security Vulnerabilities
While there are numerous vulnerabilities targeting web applications, common examples that developers should beware of include:
Cross-Site Scripting (XSS) attacks
Cross-Site Request Forgery (XSRF/CSRF) attacks
SQL injection attacks
Open redirect attacks
How to Implement Secure Coding Practices in .NET Core
Often, application code can leverage the infrastructure from .NET Core. However, sometimes its important to incorporate additional application-based security. This can either be built by utilizing new ad hoc techniques to stretch the security system. Developers can use . NET-implemented permissions to create barriers to counter malicious code from accessing critical information. Further, it’s crucial to establish a balance between usability and security in all scenarios with reliable code.
When designing and writing code, developers should secure and limit the code’s access to resources. Here are techniques developers can use to secure their code.
Never use Code Access Security (CAS)
Avoid Distributed Component Object Model (DCOM)
Avoid the AllowPartiallyTrustedCaller attribute (APTCA)
Avoid partially trusted code
Avoid .NET Remoting
Avoid binary formatters
Preventing SQL Injection Attacks
To prevent SQL injection attacks in web applications, developers can leverage typed parameters, parameterized database queries with bound, and practice using parameterized stored processes in the database. Various programming languages can be used to accomplish this procedure, like .NET, Java, and PHP. Other SQL injection attack prevention measures include:
Ensuring web application software components like plug-ins, libraries, database server
software, web server software, and frameworks are updated with the latest security patches.
Avoid using shared database accounts between different applications or websites.
Leveraging the principle of least privilege.
Configure suitable error management and handling in the code and the web server. This will ensure database error prompts are not sent to the client’s web browser.
Protecting Against Cross-site Scripting (XSS) Attacks
Secure your app from XSS attacks with these steps.
Validate User Input
Don’t trust any data emanating from untrusted sources. Instead, validate all input data and adopt the known, acceptable, good input allowlist.
Escape User Input
Escaping is the ideal of converting the core characters in the data a web page receives to prevent it from being interpreted maliciously. It bars rendering of the special characters.
Clean Data
Analyze and remove unwanted data like HTML tags which experts say are unsafe. Maintain the safe data and eliminate all unsafe features.
Securing User Authentication and Authorization
To secure authentication and authorization, developers must externalize their identity stores and access controls where possible. This included adopting mediation techniques like API gateways. Gateways facilitate authorization and authentication by combining security logic in one location.
Developers, system administrators, and companies can also lock their APIs with Identity and Access Management (IAM) solutions and core management technologies. Still, it’s worth mentioning that authorization and authentication are insufficient for API security. Companies require tooling that can sense when malicious components can manipulate API calls and modify authorization or authentication parameters.
Implementing HTTPS for Secure Communication
HTTPS prompts a browser to encrypt the data it exchanges with a web page. Encryption hides data, reducing the chances of data viewing and manipulation. This is critical, especially for websites containing sensitive data such as financial information or personl details.
To incorporate HTTPS in your domain, you should install a TLS or SSL certificate on your website. Consult your web hosting provider for a reliable HTTPS security solution. You can also request a TLS or SSL certificate and install it independently. Remember, these certificates need to be renewed periodically.
Database Access with .NET Core
Data access is a critical part of every software application. .NET core supports a range of data access options like Entity Framework Core. It’s compatible with any .NET data access framework. The data access framework a developer uses depends on their application’s needs. Separating these options from the user interface projects and ApplicationCore and containing implementation details in infrastructure facilitates the development of testable and loosely coupled software.
Overview of Database Access in .NET Core
This guide will help you understand how to gain access to MySQL database in .NET Core with C#.
Step 1: Install MySQLConnector
Navigate to the command prompt and run dotnet add package MySqlConnector. You can also right-click your project and select “Manage NuGet Packages.” enter MySqlConnector in the search box and complete the installation.
Step 2: Connection String
A model MySQL string would be:
Replace the values in the string with the suitable settings for your database. When using .NET Core, the connection string will be stored in
Step 3: Set up the ASP.NET Core
Register a database connection in:
Step 4: Launch and Use Connection
The MySqlConnection object in .NET Core will be dependency-injected into your Controller group. Launch the connection and perform a query as shown below.
Connecting to a Database Using .NET Core
Launch Visual Studio and click File > New > Project. Select the “Console Application (.NET Core)” button and click OK.
Install a dependency the (“Microsoft.EntityFrameworkCore.SqlServer”) package with NuGet Package Manager. There are two key methods of linking to the SQL Server in .NET Core.
Via scaffolding command
Via JSON configuration file
In this guide, let’s use the scaffolding method.
Before the scaffold, introduce a new “Models” folder to the Solution. You can choose a different name.
Launch the NuGet console from Tools > Nuget Package Manager > Package Manager Console. Paste the command below, but you’ll need to change it to fit your needs.
Click enter. The above command will generate the following categories:
Server -> the IP address and name of the database host
User Id -> your SQL Server login id.
DataBase -> name of your database
Password -> the SQL Server password for the specific user Id.
OutputDir -> a folder in Visual Studio where you store your Models classes
Suppose you’re logging in via the Windows Authentication method. Replace the “User ID” and “Password” parameters with “Trusted_Connection=True”
Performing CRUD Operations with .NET Core
To Execute CRUD operations in .NET core, follow these steps.
Build a respository
Create a .NET Core application
Link the application with the repository
Build all the CRUD operations in your application
Test the app
Host your application in Kestrel or IIS
Refer to our previous comprehensive guide on implementing CRUD functionality with entity.
When Should I Use .NET Core?
You can use .NET Core to build anything and for every platform or computing architecture out there. The development platform has all the tools, libraries, dependencies, and documentation you need. From mobile applications to web applications (using razor pages), desktop applications to microservices to containers, cloud applications, IoT apps, machine learning solutions, games, etc.
However, as a development platform, .NET core excels or is heavily used in the following areas:
Building Cross-Platform applications
use .NET Core if you need to develop solutions that can run on multiple platforms and you have developers using all three major OS platforms. This is often the case in large organizations or startups building complex enterprise-level solutions across multiple teams.
If you use C#, Visual Studio, Azure, and other Microsoft products
You will find it easier and more convenient to develop inside .NET Core if you primarily develop in a Microsoft environment using their tools and services such as Azure. Most developers who use C# work in .NET Core even though they may use other languages like JSON, CSS, and Typescript to add functionality to their applications.
If you develop With Microservices and Containers
.NET Core is the best dev platform for developing within the Microservices architecture where applications are arranged into independent services. Also, use .NET core if your project needs the use of Docker containers because it excels in the app container deployment approach.
Building Large, Scalable Enterprise applications
.NET Core is by far the most preferred platform for building large enterprise-level solutions that run natively or in the cloud. Microsoft has dedicated most of its resources to providing secure, scalable, and efficient business solutions for businesses.
You Need Horizontal and Backwards Compatibility
Use .NET Core if you need compatibility with solutions developed in .NET, Visual Basic, and other older systems or if working with multiple .NET frameworks concurrently.
What Is .NET Core Cross-Platform?
Cross-platform support means that .NET Core is compatible across computer platforms. You can develop and run .NET core applications in a Windows environment, Mac Os as well as Linux. All major computing architectures are also supported natively. You will not need to install third-party porting tools to implement solutions developed in a different platform other than the one you are currently using.
What are the benefits of .NET Core?
Since it was introduced, .NET Core has made a name for itself as being a versatile, scalable, secure, and easy-to-use software development environment. It has solid corporate backing in addition to the large open source community .NET Core also provides developers with an easy and cost-effective way to build and develop solutions across platforms and architectures.
You will have access to Microsoft’s robust development tools such as Visual Studio and Visual Studio Code as well as third-party dev tools, libraries, and dependencies.NET Core is also liked because it’s fast, modern, user-friendly, and lightweight due to the use of independent Nuget packages.
What Is the Latest Version Of .NET Core?
The last version of .NET Core was 3.1 last updated in August 2022. However, Microsoft adopted a more unified and traditional naming system with new versions of the same platform dropping the word “Core”. The current stable version of .NET Core with long-term support (LTS) is NET 6.
Conclusion
.NET Core is a unified, solid, and agile framework for building web APIs and web UI. It’s compatible with multiple operating systems, is community-based, and is open-source. Apart from being high-performance and lightweight, this framework has inbuilt dependency injection. Its unique features make it popular among developers.
Microsoft launched .NET Core 7.0 late last year (2022). The company introduced the first preview of .NET Core 8 recently. The future of .NET Core is bright. Visit our website for more software development related content.
Umbraco is one of the most redistributed .Net CMS (content management systems). It was developed with the .Net framework and was invented by Niels Hartvi in 2000. In 2009, Umbraco became one of the leading .Net-based open source Content Management systems downloaded through the Microsoft web platform installer. The Umbraco CMS forms a unified workflow that eliminates hurdles that can hinder your creativity. Read on to learn more about Umbraco.
What Is Umbraco?
Umbraco is written in C#. It enables users to publish content on the intranet and the internet. Since the launch of Umbraco 4.5, the CMS has been operating the MIT (Massachusetts Institute of Technology) license as software. The Umbraco CMS ensures limitless editing. The Umbraco community has 200,000 registered users. Umbraco’s code is available to the public on Github.
Umbraco CMS Features
Content editing
Umbraco offers a simple and intuitive content editor that allows you to create and edit content on your website easily.
Multi-language support
Umbraco supports multiple languages, making it easy to create websites that cater to users from different regions.
Customizable templates
Umbraco provides a range of customizable templates that you can use to build your website. You can also create your own custom templates if needed.
Flexible content structures
Umbraco allows you to create complex content structures that can be used to organize your website content in a logical way.
Media library
Umbraco includes a media library where you can store and manage all your website’s images, videos, and other media files.
User management
Umbraco allows you to create and manage user accounts, assign user roles, and control access to different parts of your website.
Search engine optimization (SEO)
Umbraco provides built-in SEO features, including support for metadata and search-friendly URLs, that can help improve your website’s search engine rankings.
E-commerce support
Umbraco offers a range of e-commerce features, including support for online shopping carts, payment gateways, and order management.
Third-party integrations
Umbraco supports a wide range of third-party integrations, including popular tools like Google Analytics, MailChimp, and Salesforce.
Mobile responsiveness
Umbraco is designed to be mobile-responsive, ensuring that your website looks great on all devices, including smartphones and tablets.
Is Umbraco a Good CMS?
Umbraco is a scalable Sitecore CMS platform that is ideal for managing multiple pages. It is user-friendly, allowing you lots of freedom when establishing integration using third-party tools. It’s also an extensible platform.
Is Umbraco a Headless CMS?
Umbraco is a headless CMS. It’s flexible for editors and user-friendly for editors. It’s developed on an open-source CMS that powers more than Umbraco websites worldwide.
Is Umbraco Free for Commercial Use?
Umbraco CMS is the free, open-source format of Umbraco. Apart from being managed by Umbraco HQ, the content management system is developed and constantly updated by an unwavering online developer community. Whether you are looking for excellent functionality or a seamless editing experience, Umbraco is a great tool.
Is Umbraco a Good CMS for Beginners?
Yes. Umbraco.com CMS is a user-friendly, open-source CMS. Experts manage it at the organization’s HQ in Denmark. You don’t have to be a technical person to manage the Umbraco backend effectively.
Which Programming Languages Does Umbraco Use?
Umbraco is predominantly written in C#. It stores data in a relational database like Microsoft SQL Server and operates on Microsoft IIS. Its frontend is developed using ASP.Net on Microsoft’s .Net Framework. Umbraco add-on CMS used standard ASP.Net features like ASP>Net master webpages to aid the creation of renewable page layouts. It supports XSLT and Razor.
Umbraco CMS Pros and Cons
Knowing the strengths and weaknesses of Umbraco helps you determine whether it’s ideal for your needs. Here are its pros and cons.
· Pros
Functionality and Limitless Design
Umbraco does not limit users to using a specific template or layout design. Its usefulness and design are endless.
Scalability and Performance
While Umbraco HTML beats WordPress, it should be configured appropriately. The phase uses ordering and reserving to help improve its presentation and convey its substance. Umbraco operates smoothly and quickly due to its consistent improvements.
Security
Umbraco CMS is one of the most secure platforms in the industry today. It’s a Net technology that inherits various .Net security features that PHP-oriented CMS systems lack. It features balances and checks to block malicious code.
Ease of Use
Umbraco is modern, spotless and client intuitive, making it easy for CMS providers to change and manage content on their websites.
Built Using the .NET Stack
Umbraco is adaptable and extensible, meaning users can quickly achieve anything along the advancement stage. It’s also futuristic, meaning you can use it in future projects.
Third-party Integration Capacity
Umbraco comes with an API platform which can be used as an effective out-of-the-case combination for foreign frameworks such as displaying suits, event booking systems, and installment entryways.
Active Developer Communities
A community of dedicated global developers plays a core role in supporting Umbraco. These developers also collaborate in providing progressing improvements to the core framework and other inbuilt bundles.
· Cons
There are various downsides of Umbraco, which include:
While Umbraco’s popularity has risen over the last few years, WordPress remains the more popular content management system.
Unsuitable for eCommerce Websites
While you can use Umbraco for eCommerce websites, the process can be challenging. Due to the unavailability of plugins, you will have to invest time to develop SEO custom modules and themes for developing and integrating into the site. Other CMS platforms come with standard inbuilt eCommerce features.
Requirements for Umbraco CMS Development
The minimum requirements for Umbraco CMS development include:
All modern browsers
An operating system
A .Net editor or tool which can include Microsoft Visual Studio 2019 16.8 or higher, SQL connection string (SQL Server), or JetBrains Rider 2020.3 and higher
Hosting from SQL Server 2019 and higher, IIS 10 and higher, or Windows Server 2019 and higher. You will also need the ability to activate permissions to incorporate write/read/create for users who own your website’s Application Pool.
Developers can choose an appropriate Umbraco Cloud pricing plan to control the hosting infrastructure.
What Is Umbraco Used For?
Umbraco CMS can be used to develop nearly every type of internet application, from mobile apps to complex eCommerce stores and enterprise portals. It is ideal for marketing agencies that want to collaborate with enterprises or small businesses seeking a scalable content management framework.
How To Use Umbraco CMS
You can use Umbraco to:
Create websites
Configure multilingual web pages. Worth pointing out is that the language variants functionality is only available in Umbraco 8.
As a marketing tool
To develop a custom dashboard
To implement the editor’s manual
As a starter kit for beginners
Umbraco CMS Example
Add and annul from the runtime cache. This tutorial involves the use of tags on a website that features two tag properties which are:
One for each page using the blog tag group
One for each page using the default tag group
In this example, developers exposed an endpoint allowing them to acquire the tags from each group. The default tags should be cached for one minute, while the blog tags would remain cached until the website restarts or when the developers publish a blog post node at the back office. Tags are perfect for demo purposes because they aren’t cached by default.
· TagService
First, developers will create a CacheTagService. Here, a primary class with a single method (GetAll) covers Umbraco’s TagQuery.GetAllTags(). Now developers can introduce ICacheTagService in any builder in their project.
· API
Here, the developer will develop an endpoint where they can collect the cached tags.
Now that we have our service, it’s time to create an endpoint where we can fetch the (cached) tags.
Everything should now work well regarding acquiring tags. However, the changes won’t appear on the endpoint if you return to your back office and include a new tag on your blog. Here is how to fix that.
· Unblocking Cache on Publish
To unblock the cache, the developer will require a notification manager where they register to the ContentPublishedNotification case on the ContentService. That allows them to run a code section when they publish a node.
After acquiring the notification, the registration process follows. Include builder.AddNotificationHandler<ContentPublishedNotification, Notification>() in the composer category to the compose process. It will appear as shown in the image below.
Now you will have configured caching on your tags, accelerating your site’s performance.
Umbraco CMS Example Sites
Microsoft ASP.NET
The official website for Microsoft’s ASP.NET web application framework is built using Umbraco CMS. The site features a clean and modern design with easy navigation and organized content.
Costa Coffee
Costa Coffee, a popular UK-based coffee chain, uses Umbraco CMS for their website. The site features an engaging and interactive design with information about their products, promotions, and locations.
Heinz
Heinz, a global food company, uses Umbraco CMS for their website. The site features a clean and modern design with easy navigation, recipe ideas, and information about their products.
Peugeot
Peugeot, a French automotive company, uses Umbraco CMS for their website. The site features a sleek and stylish design with information about their cars, services, and promotions.
Amnesty International
The Amnesty International UK website is built using Umbraco CMS. The site features a simple and user-friendly design with information about human rights issues and how to get involved in the organization’s campaigns.
Finally
Umbraco CMS is one of the oldest platforms that comes with unique functions. It has undergone numerous significant improvements and changes since it was first developed. Umbraco CMS comes with pros and cons as we have seen in this article. Contact us today to learn more about Umbraco CMS and how you can use it to fulfill your business needs.
Do you dream of starting a successful SaaS business but don’t know where to get funding? You are not alone. Most software tech startups aren’t viable for funding right off the bat. Studies have shown that less than 30% of startups attract funding pre-revenue. You have a better chance of moving from idea to business using the bootstrapping method.
In this guide, we go through the startup bootstrapping method focusing on SaaS startups. You’ll get to understand what it means to bootstrap your SaaS company, its pros and cons, real-world success stories, and so much more.
What Does Bootstrapping a Saas Startup Mean?
Bootstrapping a Saas startup means self-funding your SaaS startup in the early stages or using private funding sources. It has become one of the most used funding methods for software tech startups because most entrepreneurs find it hard to attract funding until they are a viable business.
The main funding source for bootstrapped SaaS companies include the following:
Personal savings
Plowed back profits
Contributions from friends and family
You can use one or a combination of the three to fund your SaaS business so that you can set up the basics and start earning some revenue. Early-stage SaaS startup survival depends on how well the entrepreneur can manage costs and their ability to attract early adopters. You don’t need to spend so much on inputs as a SaaS as you are not dealing with physical products.
14 Tips to Bootstrap Your SaaS Startup
So, you have decided to “pull yourself up by the bootstraps” to move from idea to real business without external funding. How do you go about it? You can use several tried and tested strategies to increase your chances of success. Right off the bat, your main goal while bootstrapping is to be as efficient as possible with the little capital you have.
1. Make Sure You are Have a Valid Business
Doing your business validation from the start before you bootstrap is very important. You have less room for failure while bootstrapping because the consequences can be quite costly for you and the people who trusted you. Make sure you do all the viability tests on your SaaS idea internally and externally before moving ahead.
Smoke tests are important for validating SaaS products and enabling pre-selling. Ensure your SaaS product goes through multiple smoke tests at every stage, even before looking for partners or more funding. You will have a better chance of pre-selling a product you have full confidence in if it passes all the smoke tests.
2. Find the Right Co-founders and Mentors
It’s important to get the right person or people who will be dedicated to the hustle as co-founders, mentors, or advisory board members. If you can find these people to work with you, you have a better chance of turning your business idea into a profitable entity without investors. These people will put in the work from the word go so that you don’t have to look outwardly to get things done.
3. Choose Condensed Methodologies
If you choose the bootstrapping method, you don’t have the luxury of time or money. You need to find ways to get your SaaS product to market as soon as possible to get some cash flow going. For this reason, methods such as RAPID and AGILE that condense the process and emphasize cost-saving are ideal. You can use a combination of methods that work for you based on your SaaS product.
4. Look for Early Adopters
Not every SaaS business requires early adopters, but they are needed if it is a bootstrapped SaaS. You must start attracting customers as soon as you have something usable in the market, so your early activities should include attracting early adopters. You might find it easier to attract early adopters by developing a minimum viable product (MVP) early on.
5. Use Cost-Saving Hiring Strategies
Since it is a SaaS startup, you have more freedom in your hiring and work arrangement approach. For example, you can consider hiring remote developers for some parts of the development process to save costs. To cut your costs even further and increase MRR/ARR later, consider having a small team or working from a co-working space.
6. Offering Equity Instead of Salaries
Depending on the nature of your SaaS business and long-term goals, you may find it easier to bootstrap by offering equity instead of salaries to your early employees. Equity makes the employees part owners of your business but does not necessarily give them voting rights. You will be able to attract the best talent without spending too much on salaries and other benefits.
While considering equity as a cost-saving strategy, you may also consider offering equity for external services and expertise. For instance, offer a percentage of your company to a marketing or law firm if you need their services. You’ll be surprised that many companies are willing to take equity so long as they see the viability of your company.
7. Optimize Internal Processes
Your efforts as a bootstrapped SaaS startup should optimize internal processes so you can achieve peak efficiency. Ideally, you must ensure that everything you do is directed towards creating or improving your SaaS product and bringing it to market and that money is put to the right use. You may need to hire consultants to help with things from time to time.
8. Make Use of Unconventional Marketing Methods
It would help if you went beyond the basics in your marketing to succeed, whether viral social media campaigns, click funnels, or guerrilla marketing. If executed well, these insanely effective but unconventional marketing methods don’t cost as much as normal methods. For instance, a single bold advertising booth in an industry event can deliver a dozen early adopters to get you going.
Marketing is your first and probably the only tool you have to compete with other well-funded SaaS startups, so you have to get it right from the start. Some bootstrappers even go as far as spending more on marketing in comparison to development. If you have confidence and can make a good product with a small team, then by all means, put your money in marketing and get some early traction.
9. Take advantage of Free Tools and Resources to Save money
Building a SaaS business, you probably know your way around the internet. There are so many free tools out there you can use when building your SaaS startup to save money. For example, take advantage of AWS or Google, IaaS, or PaaS tiers to build your product when starting to save money. Take advantage of offers and deals on sites like Appsumo to save on costs.
Here is a list of some of the free tools and resources you can use as bootstrapped SaaS startup in 2022 and beyond:
AWS free tier– free cloud computing resources. You get access to 12 months, always free offer or short-term trials for specialized cloud computing resources
Google cloud free tier and free trials– Google cloud has a generous free tier and free trials for all popular products on its IaaS and PaaS platform
Free SaaS tools- take advantage of the numerous free SaaS products when starting to save on costs. For example, there are numerous customer relationship management tools out there you can use internally, even for commercial purposes.
Use Open source tools- You can find open-source alternatives to expensive tools you need while developing your SaaS product. For instance, you can use free and open source Linux web servers instead of expensive premium web servers to save cost. It’s easy to migrate or add features and functionality later on when you want to scale
Find deals on premium tools– Even when it is necessary to use premium tools like Microsoft Office and Adobe products, you can save on subscription costs by finding deals online. Use websites like Appsumo, StackSocial, SaaSPirate, DealMirror, and Digitalthink to find good deals on premium tools.
10. Use Free libraries and dev resources
A tried and tested way to save on development costs and time is to find and use free libraries for your project. You don’t have to reinvent the wheel on so many things because there are devs out there publishing useful libraries and tools for other devs. Use these libraries, APIs, and dev resources, especially as a bootstrapped SaaS startup.
11. The Power of Positive Feedback and Referrals
You are already playing catchup even to class C and D-funded startups when bootstrapping, so you better bring your A-game from the word go. If you are developing Beta versions of your SaaS product or using the MVP route, you want to ensure that it is really good and worth a five-star review.
You can save a lot of money and resources by allowing early customers to use your product and provide feedback. The feedback will help you improve your product and create a buzz for your business, bringing more people to your door. You may even attract some early investors or high-profile clients through referrals.
12. Work in Building Key Partnerships
You may not be a class A funded SaaS startup, but it doesn’t mean you cannot attract key partnerships early on. If your SaaS product is good and useful, you won’t have trouble finding key partners to help you gain market traction and cash flow. For example, Uber and Airbnb formed key partnerships with car manufacturers and landlords even before coming to market.
Partnerships don’t have to be with other businesses or big companies in your primary market. You can also form partnerships with family members, other developers, and mentors who will provide the things you need in your startup journey. Need some office space? Maybe your neighbor or relative could have some space to spare.
13. Focus on Cashflow and Revenue
You know the failure rate for startups, but do you know your chances of succeeding while bootstrapping? Research shows that 90% of startups fail for one reason or another, but the figure is close to 95% for those who fail to attract funding in the early stages.
However, you can be encouraged by the fact that many of the failures happen for reasons you can control better as a bootstrapped business. It’s easier to avoid failure while bootstrapping because you can focus on revenues and cash flow from the word go.
You have full confidence in your product, depend on early adopters, and want to get selling as quickly as possible. With this approach, you are more likely to fall in the 10% bracket than a class A funded startup.
14. Outsource to Survive
Don’t be too excited after seeing revenues streaming in; start hiring new people or expanding your team. Early success could be a false positive because of the effort you may have put in and goodwill from partners and people who contributed to your startup.
If you want things done, the best approach is to outsource while keeping the core tasks internally. Use online outsourcing platforms like Upwork to find the right people to do things for you. For instance, instead of hiring a team of assistants, you can get virtual assistants on Upwork. These people will work with you as freelancers and can be onboarded and offloaded as required.
What Are the Pros and Cons of Saas Bootstrapping?
Bootstrapping has its advantages and disadvantages as a small business launching model. The main advantages are that you get to keep all or a big percentage of equity, maintain full control of your business, and can be happy with your hard work at some point. You also worry less about failing because you are mostly self-funded- allowing you to focus on the business.
Conversely, using private funding sources to bootstrap lays a big risk on you as a person. Some entrepreneurs end up going bankrupt when their bootstrapped businesses go under. However, most are willing to take this risk, especially if they believe in their idea and venture capital is not an option.
In the end, SaaS bootstrapping seems like a viable option, given the difficulties of attracting investors in this competitive industry. If you believe you have potential customers and can build a solid customer base for good cash flow, then you should go for it. Want to develop your SaaS product today? We can help you Hire a .NET Developer to get started right away!
Using Custom Real Estate CRM Software has become one of the biggest trends in real estate management. Gone are the days when all you had to manage deals and customers was a string of overly complex spreadsheet workbooks and business cards. A CRM makes it easy to keep track of everything and close more deals.
In this guide, we take a deep dive into customer Real estate CRMs. Stick around to the end if you want to learn everything you need to know about developing custom real estate CRMs. More importantly, we’ll explore the real estate CRM value proposition based on real industry insights.
What Is A Custom Real Estate CRM?
A general-purpose customer relationship management helps businesses streamline communications with their customers and may have some marketing and sales features baked in. A custom real estate CRM has all the features of a CRM but is designed for real estate companies. The custom CRM system will come with several real estate-specific features such as:
Contact Management
At the heart of any modern customer relationship management system is contact management. A customer real estate CRM should be designed to help real estate companies create and manage complex contact data stores to be used daily. The ability to use contacts to generate leads and close deals is invaluable to any real estate business
As is often the case, generic CRMs have an average contact management module that may not fit your business setup. For instance, your real estate company may want a CRM contact management system that pulls contacts from different sources and makes them available on the go. By designing a custom CRM, you get to choose precisely how contacts are managed and be in control of data privacy for compliance purposes.
Organized communication
Customer relationship management systems were mainly designed to streamline communications between businesses and customers. This primary feature is available in all CRMs but implemented in various ways based on the target market. For instance, Salesforce emphasizes B2C sales communication with no particular industry in mind.
A custom real estate CRM is designed to make it for real estate companies and agents to communicate with clients, suppliers and contractors. It should have specific features that ease communication between the business and any of these stakeholders and ensure the medium used is effective. For instance, email communication can be used for client-facing communications. In contrast, chatbots and automated calls can be used for marketing efforts.
Lead Generation
Modern CRM systems also double up as advertising planning and lead generation tools. You can use the CRM to plan multi-channel advertising campaigns and generate leads. Lead generation is a basic feature you will find in most general-purpose CRMs out there. However, you can take it further with a custom CRM for your real estate that compliments your online and offline lead-gen efforts.
For instance, a custom real estate CRM should be able to pick up leads from the company website and landing pages and put them in a marketing and sales pipeline for the team to dive into. Such functionality is hard to implement in an off-the-shelf CRM unless you are willing to pay top dollar to the developer.
Marketing Automation
One of the most powerful features of modern CRMs is marketing automation. With a few clicks, you can create powerful marketing campaigns on multiple channels to reach your clients wherever they are. CRM solutions can be used to create and manage complex email sequence campaigns, social media campaigns, offline marketing campaigns, and automated ads.
With a custom real estate CRM, more like an ERP, you can quickly create marketing campaigns that align with your company’s marketing strategy. For instance, the CRM can be customized to use templates created by your marketing team on the go for faster implementation. Imagine being able to create video clips and branding them in the field using your CRM.
Email Management
The CRM helps create and manage contact lists and automated email campaigns and helps your team manage and keep track of emails. Modern CRMs have powerful email management features that make emails an asset rather than a burden to the recipients. They will help you categorize emails, and follow-ups, automate replies, connect with shareable resources etc.
By designing a custom real estate CRM, you can define precisely how you want your email communications managed and achieve better integration with the existing system. For example, you can ask the development team to integrate the system with an existing mail server for an easy transition.
Daily Planning
CRM systems also come with excellent planning and scheduling features. Within the CRM, you can plan your day based on your customer-facing activities, like when you will call customers or respond to emails. Their calendar features are also centred around customer-facing activities such as scheduling meetings and phone calls.
While these planning features are excellent in their basic form, designing your custom real estate CRM gives you much more room to make it your own based on your daily activities. You can add customization to the scheduling and calendar module to suit specific workflows and needs. For example, a custom real estate CRM can have a planner matching field agents’ daily routines or sales team members.
Feedback Processing
Businesses receive a lot of feedback from customers from various channels and locations. A customer relationship management system has modules to gather and organize all this feedback. This allows businesses to digest what the customer is saying and even get timely notifications when feedback is received. They can even use the same feedback for promotional purposes in various ways.
Feedback processing can be even more robust if a custom solution is developed instead of a generic one. With the custom real estate CRM, you are free to design modules that capture feedback from specific channels that are of more use to you than others.
For instance, most real estate companies are likely to be more interested in Zillow.com reviews than on general sites like Facebook. You can only achieve this granular level of control by designing a custom real estate CRM.
Data Synchronization
One of the biggest challenges for businesses dealing with multiple clients is synchronizing data coming from different sources relating to customers. For instance, synchronizing support communication to sales and marketing communications, financial data to upselling or after-sales Service. A good CRM helps you synchronize any data that needs to be synchronized for easier decision-making.
A custom-built CRM will allow you to dial down on the power of data synchronization because you will have control over what data needs to be related to or linked to what and how these relationships are defined. For instance, you can choose to have data from sales inquiries synchronized with marketing to close more deals as a property management or real estate company.
Data Analytics
Modern CRM systems have powerful data analytics features to help companies make sense of a large amount of data they get from customer-facing activities. They can use inbuilt data processing algorithms to crunch both structured and unstructured data and present it in easy-to-digest dashboards for end-users.
As a real estate business, you want to define what processing on customer data, metrics used, and how it is presented for easy decision making. A custom CRM will allow you to process and use customer data to stay ahead of the competition through data-driven decision-making and overall strategy. It’ll even make more sense when dealing with unstructured data from multiple sources, as is often the case in real estate.
Process Management
Last but not least, most customer relationship management systems are designed to help businesses manage complex customer-facing processes. For instance, you can use your CRM to manage the property closing process to ensure every crucial step is completed correctly. The CRM will also record all activities in every process for easy retrieval or reference.
Process management is one of the key selling points of CRMs. However, you may have to improvise or modify a lot when using a generic CRM for your real estate businesses. Instead, you can opt to design your own CRM that has process templates that match your internal process. For example, it is possible to design a CRM that guides the customer on the house financing process from start to finish.
Benefits of CRM For Real Estate?
There are many reasons why switching to a customer relationship management system is a no-brainer for any modern real estate company or individual realtor. Here are some of them:
A CRM Will Keep You Organized
CRMs are designed to help businesses keep track of large amounts of data coming in and out and customer-facing activities like sales, marketing, support and deal closing. With a good CRM platform, you won’t have to do much organizing to stay on top of things because they do everything for you. CRMs have intuitive dashboards to help you keep track of every organization’s process, activity or communication.
For example, lead generation is a typical business process likely to involve several people in your organization. Some lead generation activities could be happening on popular social media channels. In contrast, others could be offline with your filed realtors linking with potential customers. Keeping track of all these processes can be hectic unless you start using a CRM with data synchronization.
Easy Activity Planning and Tracking
Today’s real estate industry involves a lot of activities that usually involve the customer in one way or another. Every day, you may have one or more field agents visiting properties, negotiating deals with potential clients, closing deals or supervising other people working on your property. You need a solution that helps you stay on top of these complex workflows through planning and activity tracking.
Most CRM systems help with complex activity planning and workflow tracking, especially for customer-facing activities. You’ll get real-time updates on what your people are working on and can also pull and use customer data on the go to help those out there do their job. With real-time tracking and planning, you are also able to do quick follow-ups when needed, as you have everything you need on the dashboards
Automating Processes
Real estate CRMs are all about automating as many processes as possible so that you can concentrate on the important tasks. You can design your CRM to automate invoicing, cold outreach communication, customer data collection through forms, contact management etc. Custom real estate CRMs can even automate a complex process like property valuation when fed with the correct data.
Easy Real Estate Project Management
Project management is an additional feature in most modern customer relationship management software, so it should be included in your custom CRM. Project management in real estate CRM may include assigning tasks, tracking the progress of ongoing real estate projects like renovations etc. Having this functionality in your CRM is good as it helps you keep your data synchronized.
Improving Customer Experiences
Companies in the real estate industry have not been known for having the best customer experiences mainly because of the complexities of closing property deals and the number of people involved. You can ensure your customers have the best experiences by investing in CRM. Using a CRM, you’ll be assured that all your customers are served in the best way possible and that they have an easy way to interact with you.
CRMs were created to improve customer experiences as many features are aimed at customer-facing activities like support and sales. For real estate companies, these features can help streamline many customer-facing activities leading to improved customer experiences. For instance, using CRM, you can design easy FAQs for each property you are putting in the market.
Increasing Sales
There is a reason CRM adoption among sales professionals globally is 75% – G2 CRM research. CRMs can help increase sales by 29% or more, depending on the industry. By using a CRM in your real estate company, you are tapping into its sales automation features which are finetuned to streamline sales processes and help you close more deals.
Increase The productivity of Your Team
Thanks to task automation and ready insights, a CRM makes it easier for team members to accomplish more. Companies who have switched from manual or spreadsheets to CRMs have reported sharp increases in productivity as employees don’t spend time doing simple repetitive tasks. For example, your agents don’t have to spend time drafting and sending emails if you have a CRM.
Improved Decision Making and Strategy With Data Analytics
The data analytics component in modern CRM systems is very important for real estate businesses. The CRM pulls customer, and internal data from different sources, process it and presents it in a way that can help with decision making. Insights derived from the CRM’s analytics can inform many decisions and strategies in a real estate company, such as upselling, cross-selling, diversification and segmentation.
Central Customer Data storage for Easy retrieval and Service
In the past, even small real estate companies stored their data all over and in different formats. For instance, customer invoices are stored in accounts and closing documents elsewhere. A CRM enables you to have a secure central storage of all customer data so that it is easily accessible whenever needed. This leads to faster customer service and better experiences for everyone involved.
Streamlined Internal and External Communication
A CRM streamlines communication between internal teams as well as with external teams. Teams can easily share information based on their work and collaborate without ever having to leave the CRM. External communication is also easy because everything is set to facilitate smooth communication.
Why should I develop my CRM?
There are a couple of reasons you should consider developing your own CRM, the obvious one being that a custom one is more likely to cater to your business needs better than a generic one. You’ll have more say on the functionality that will be added to the CRM and how the final product works and looks.
Here is a more detailed look at some of the advantages of custom real estate CRM:
Functionality
You will have more control over the type and number of features added to the CRM based on your business needs.
Customer Data
You can control how customer data is collected and processed, and stored. This kind of control is vital if you are worried about compliance or dealing with business clients with sensitive data.
Sales Process
Better control over how the CRM handles the sales process, pipeline or sales cycle. Each real estate company has its unique sales process, which may be hard to implement in a generic CRM.
Contact Management
Do you have specific requirements for how you want your contacts managed? You can only achieve this through a custom CRM.
Modules
Modules can be features or functionalities. It’s easier to add and remove modules to a custom-made CRM than to an off-the-shelf one.
Email Templates
You’ll find it easier to design and implement email templates in your own CRM than in a third-party CRM with strict design requirements.
How to create custom Real Estate CRM
Unless you have an internal app development team, the best way to create a custom CRM is to look for app development services from an external developer. Look for a developer that has worked with real estate agencies because they are more likely to understand and appreciate the real estate business model.
Here are some basic CRM features that you should be aiming at if you are looking for custom solutions:
A dashboard
Email management
Lead management
Contact management
Data analytics
Marketing module
Communications module
Collaboration module
Project management module
Listing management
Report management
Ad management
The idea is to end up with customer relationship management software designed with your need in mind but also comes with all the good things that modern CRMs offer. To achieve this, you must be involved in every step of the process or have some real estate professionals attached to the app development team.
How Long Does It Take to Develop A Real Estate CRM?
Generally, it would take between a year to two years to develop a fully-functional real-estate CRM. However, development timelines depend on the software development company you choose to work with and the size of the development team assigned to the project. You might be able to save on time and cost if you can find startups that have the web development talent needed to develop your solution. Start today and find your custom real estate CRM developer.
Switzerland’s technology industry features(including Swiss .Net Companies) in the top ten in Europe . According to a 2018 SET (State of European Technology) report, the cities of Geneva, Lausanne and Zurich had the largest tech communities in Switzerland.
This review will look at the top tech companies in Switzerland specializing in .NET, including mobile app design, UX (user experience), web design, web development, etc. Let’s go!
Is Switzerland Good for .Net Developers?
Switzerland is very rewarding for .NET developers. Obviously, you need a university degree specializing in .NET and hone your skills by interning in of the top Swiss .NET companies.
Once you’re done with your internship, you can be employed full-time or part-time. A relatively inexperienced .NET developer with between one and four years of experience earns an average annual salary of roughly $77,000 or 78,000 CHF, including bonuses and overtime pay.
A moderately experienced .NET software engineer with between five and nine years of experience earns an average salary of roughly $87,250. Finally, an experienced developer with between 10 and 20 years of experience earns an average salary of roughly $97,100.
What Are the Benefits of Working in Swiss .Net Companies?
Endless Growth Prospects
If you love learning and advancing, you’ll love the opportunities in Switzerland’s .NET industry. You won’t find yourself stagnating at any point. You’ll acquire new skills and get to apply them in various companies and sectors.
Impressive Perks & Benefits
Some of the benefits of the Swiss .Net Companies include healthcare insurance, paid leave, gym memberships (some companies), staff stock options, meals, etc.
Work Remote with Flexible Hours
Swiss .Net Companies is part of the tech industry which is renowned for its hybrid and remote working models. As long as the product in development is done per the client’s wishes and on time, .NET developers or programmers don’t have to be in the office all the time.
Top Swiss .Net Companies
Astarios
Astarios is a .NET company based in Zurich, Switzerland, with a development center in Kyiv, Ukraine. The company specializes in secure software development as well as value addition services like DevOps, IoT, mobile and web development.
Axon Active
Axon Active is a Swiss offshore .NET software development firm based in Lucerne. The company specializes in Agile development and works with SMBs as well as large corporates.
Bacula Systems
Bacula Systems is based in the municipality of Yverdon-Les-Bains, Switzerland, and it’s the largest enterprise open-core network backup and restoration company. The company combines Bacula’s leading open standards software with first-class support.
Compassites Software Solutions Pvt Ltd
Compassites Software Solutions is a bespoke software development firm that specializes in big data analytics, cloud computing, digital experience, testing, among other things. Compassites Software Solutions Pvt Ltd has main offices in Zurich, Switzerland.
DataArt
DataArt is an international software development company with offices in cities like Zug, Switzerland. With over two decades of experience and on-site teams of highly trained developers and programmers, DataArt helps clients develop custom software.
Emirates Graphic
Emirates Graphic is a software development company with its head office in Dubai, UAE and offices in cities like Geneva, Switzerland. The company offers mobile application and web development services, UI and UX, etc.
ESGROUP
ESGROUP is a .NET company based in Zurich, Switzerland. The company develops unique backend mobile and web applications to empower businesses of all sizes.
Kidan
Kidan is a Swiss company offering back, and front-end information technology solutions to help companies around the world do more with existing and new technologies. The company is based in the Swiss municipality of Allaman.
Knobotech
Knobotech is a software development company based in Zurich, Switzerland. The company develops Android and iOS apps using PWA (progressive web app) technology.
KompiTech
KompiTech is a tech company based in Zurich, Switzerland, specializing in ITSM and blockchain solutions. The company has offices in other cities like Cape Town and Prague.
OQTACORE
OQTACORE is a .NET company based in Lausanne, Switzerland. The company has developers and programmers specializing in blockchain, web and mobile development.
Radity is a Zurich-based company that transforms ideas into products optimized for ROI and scalability. The company works with SMBs as well as large companies.
Rocketlab
Rocketlab is a Zurich-based .NET company that provides experienced software dev teams to SMBs in Switzerland and other European countries like Bulgaria and the United Kingdom.
Solid Visions
Solid Visions is a top software dev company based in Wallbach, Switzerland. With more than a decade of experience, the company offers C#, JavaScript, .NET, PHP, SQL, etc.
SSI (Software Service & Innovation)
SSI (Software Service & Innovation) is a .NET company based in Geneva, Switzerland, with a development center in L’viv, Ukraine. The company claims that it develops smart IT solutions and that its team is experienced in DevOps and Agile software development.
Swiss Global Services
Swiss Global Services is based in Zurich, Switzerland and is one of the country’s largest web hosting services firms. Apart from web hosting, Swiss Global Services is also involved in .Net mobile app and web development.
Swissprime Technologies AG
Swissprime Technologies is based in Zurich and helps businesses transform their visions into reality. The company has an in-house project development team with experience in app development, cloud solutions, IoT and project management.
UppLabs LLC
UppLabs LLC is a software development company with over a decade of experience and more than 1000 successful developments. The company has its head office in Lausanne, Switzerland and offices in other major European cities.
Valudio GmbH
Valudio GmbH is a .NET company headquartered in Switzerland’s largest city, Zurich. The company prides itself as a software development studio for mobile and web applications. The company builds software for startups and corporates.
Webcase
Webcase is one of the few software dev companies situated in the city of Basel. The company has an experienced team of developers that can offer various software solutions.
What Are Some of the Popular Technologies That Swiss .Net Companies Use?
ASP.NET Core
The ASP.NET Core is an upgrade over ASP.NET, and research shows more and more companies are adopting this framework. This indicates that the .NET software development sector is shifting towards open-source software development.
Microsoft Azure
Microsoft Azure has dominated the cloud computing sector and is used by software development companies, including those in Switzerland. This isn’t surprising because Azure has cutting-edge security features and SLAs (service level agreements).
.NET Version 6
The sixth iteration of .NET, .NET Version 6, is the latest NET framework from Microsoft. .NET companies are adopting this framework because it’s compatible with macOS, Windows, etc.
Conclusion
In conclusion, listed above are the top Swiss .Net Companies or have offices there in Switzerland. We have also included some of the technologies that these companies use to develop products. So, if you need .NET development, go ahead and reach out to one of them.
If you’re currently a SharePoint user, you might have heard about Sitecore. After all, Microsoft is recommending it as an alternative CMS. Whatever your reasons for wanting to know what Sitecore CMS is, we’ll answer that in this in-depth review.
What Is Sitecore CMS?
Sitecore is one of the top enterprise-grade CMSs built on ASP.NET. It allows salesforce and web content management teams to have complete control over all website elements, from advanced personalization and blog posts to ecommerce and social integration and more.
Currently, on its 7th version, Sitecore runs on .NET 2.0 or 4.0, and the core has been reworked from scratch to make the most of improvements made in ASP.NET 4.5.
Sitecore CMS is the driver of all Sitecore-powered sites. Having leveraged the safety, scalability, and versatility of the .NET framework, it’s an enterprise darling used by leading multinationals such as Canon, Nestle, and Toshiba.
What Type of CMS Is Sitecore?
Sitecore is an enterprise-grade .NET-based CMS. The Sitecore Web CMS (content management system) is known as the Sitecore Web Experience Manager or Sitecore Experience Manager.
Is Sitecore a Good CMS?
Yes, Sitecore is a good CMS, especially if you’re looking for a top-of-the-line CMS with broad workflow capabilities that allow you to:
Build customer interaction with bespoke real-time suggestions
Engage with users in various languages across various devices.
Leverage reusable content, modules, and layout, which speeds up your content delivery.
Sitecore CMS Architecture
Sitecore CMS is a popular enterprise-level content management system used by many businesses worldwide. Its powerful and flexible architecture allows for the creation and management of complex digital experiences across multiple channels and devices.
At its core, Sitecore CMS is built on top of the Microsoft .NET Framework and uses a variety of technologies and architectural patterns to provide a robust and scalable platform for managing digital content. Let’s take a closer look at the key components of Sitecore CMS architecture.
Databases
Sitecore CMS uses several databases to store and manage content, configuration, and other data. These databases include:
Master database: contains the original source of all content items, as well as configuration information, user data, and other metadata.
Core database: contains information about Sitecore CMS itself, including settings, pipelines, and events.
Web database: contains published content that is available to website visitors.
Analytics database: stores visitor data, including session and interaction data, which is used to personalize content and measure marketing effectiveness.
Reporting database: stores aggregated visitor data for reporting and analysis.
Servers
Sitecore CMS is designed to be deployed on a scalable infrastructure that can handle high traffic and large volumes of content. The system consists of several server roles, each of which serves a specific purpose. These server roles include:
Content Management Server: responsible for managing content, configuration, and user data. This server role is used by content authors, marketers, and other users who need to create, edit, and publish content.
Content Delivery Server: responsible for delivering content to website visitors. This server role is optimized for high performance and scalability, and it can be deployed in a load-balanced configuration to handle high traffic volumes.
Processing Server: responsible for handling background processing tasks, such as indexing, search, and email campaigns.
Reporting Server: responsible for generating reports and analysis based on visitor data.
Pipelines
Sitecore CMS uses a pipeline architecture to handle requests and events within the system. A pipeline is a series of stages that are executed in sequence, with each stage responsible for a specific task. Pipelines are used throughout the system for various purposes, such as:
Request processing: Sitecore CMS uses pipelines to handle incoming requests, such as page requests or API calls. Each pipeline stage can modify the request or response as needed, allowing for custom processing logic to be added.
Event handling:Sitecore CMS raises events throughout the system to signal various actions, such as content changes or user logins. Pipelines are used to handle these events and execute custom code in response.
Data processing: Sitecore CMS uses pipelines to handle data processing tasks, such as indexing content or executing email campaigns.
Item Folders
Content
The Content item folder is where all the data and pages for a website are held, and the structure of these components represents the site’s structure.
Media
The Media Library is where all the physical multimedia files of a site can be kept either as a blob in the database or on the file system.
Layout
All the ASPX ‘layouts’ for the web app are confirmed in the Layout item folder. As a result, this references the file’s location in the web app root. It also features ‘sublayouts,’ DXP files representing fragments such as widgets used to create a page.
System
The System item folder is where the web application and the basic settings for the Content Editor are kept. For instance, if you wanted to include another language in your web application, this is where you would add it.
Templates
The Templates item folder is where all the site’s template items are stored. Template items describe items in Sitecore and highlight what field the item will have. For instance, a news article with a layout and standard page templates.
APIs
Sitecore CMS provides several APIs that can be used to interact with the system programmatically. These APIs include:
Sitecore Services Client: a RESTful API that can be used to retrieve and manipulate content, media, and other resources.
Sitecore Item API: a .NET API that can be used to interact with content items in the system.
Sitecore Query API: a query language that can be used to retrieve content from the system using a SQL-like syntax.
Sitecore Search API: an API that can be used to perform full-text search and indexing on content items in the system.
Sitecore CMS architecture provides a flexible and scalable platform for managing digital content and delivering personalized experiences to website visitors. Its modular design allows for customization and extensibility, and its robust set of APIs enables integration with other systems and platforms.
Sitecore Community
There is an extensive developer community which makes kicking it off with Sitecore a breeze. Sitecore usually hosts developer forums at various locations to encourage the developer community to be more involved in Sitecore.
Sitecore is very open with the developer community and often demos what they are building internally and has development teams often answer questions on social media; Twitter.
What Does Sitecore Include? Key Features & Benefits
Sitecore Key Features
Automation
For businesses, Sitecore can automate campaigns helping your marketing department remain productive and ensure you never miss out on exceeding client expectations.
Whether your company model is B2B or B2C, you need to offer a digital experience platform to your consumers all through the buying journey, which means having the right message in front of the right people at the right time.
Customer Data Management
When you understand your users at a fundamental level, it’s easier to give them what they want. Sitecore website helps you incorporate user data, track user behaviors across all channels, and share these details with critical stakeholders.
Using Sitecore’s data insights, you can even find ‘hidden’ audiences you were previously oblivious of, helping you concentrate on new growth prospects.
Headless Commerce
Headless commerce is fast becoming the ‘way of the future’ in ecommerce. However, it has effects on many use-cases, such as content delivery.
For instance, it allows the split of front-end and back-end Sitecore experience commerce layers allowing brands to be agile and leverage tech such as artificial intelligence and virtual reality.
Multi-language and Multi-Site Content Support
Global expansion brings a wide range of complexities. One of the more challenging ones is providing an on-brand user experience to new clients and staff in new locations.
Sitecore offers multi-dialect support, which shortens your time to market. This helps you stay on an upward trajectory regardless of where you have operations. For instance, in the hospitality industry, businesses need to appeal to travellers worldwide.
Powerful Content Management
Content management is an Omnichannel beast when it comes to enterprise. Sitecore CMS streamlines content generation, management, and organizations.
Even if you’re working with content creators, distributed teams, freelancers, or multilingual developers, Sitecore makes it easy to create at scale.
Sitecore Benefits
Ease of Deployment
Sitecore’s structural design allows developers to deploy and oversee infinite amounts of code across various sites within one instance.
Faster Development
Sitecore’s CMS allows developers to finish their tasks quicker while eliminating the likelihood of errors. Sitecore also supports external components and the incorporation of code completion enhancements and debugging tools.
Security
Using Sitecore, developers can limit user access at the account or component level, which is handy for projects that involve numerous stakeholders.
Sitecore’s security model also has an ‘Inheritance Access’ right; this governs how security rights can be handed down from parent components to child components.
Sitecore CMS Vs. Sitecore DMS: What’s The Difference?
When people are researching Sitecore, there is a confusion that comes up. Should they pick Sitecore CMS or Sitecore DMS, and what’s the difference between both? It’s worth noting that these terms refer to different features available within Sitecore.
For starters, Sitecore CMS (Content Management System) is a platform you can utilize to build, control and publish content on a single website or family of websites. The Sitecore CMS is officially known as the Sitecore Web Experience Manager.
Sitecore DMS (Digital Marketing System), on the other hand, is an impressive suite of marketing automation features that have Sitecore-like analytics, personalization, testing, and more. The Sitecore DMS is officially known as the Sitecore Experience Platform.
Think of the CMS as the Sitecore portion that allows you to create and publish content and the DMS as the portion that helps you deliver that content to the right clients at the right time.
How Does Sitecore Work? A Quick Look at The UI
If you have used a Windows desktop or laptop before, you’ll have no issue getting used to the nitty-gritties of Sitecore. Sitecore is exclusive among content management systems in that it uses a web interface that feels similar to a Windows PC.
You can toggle between content and databases, scroll down to find a content fragment in a content tree, or search your media library to find a particular web layout or digital asset.
How Do I Know If I Need Sitecore?
You’ll know you need Sitecore if you have the following requirements:
You have numerous landing pages and websites, and you’re in dire need of a CMS platform that enables you to control all your domains.
You need a CRM tool that offers economies of scale by eliminating maintenance costs, redundant hosting, and training.
You need a content management system that enables you to leverage modules and reusable layouts and content across your sites, such as privacy policy or universal footer.
You want to localize content with country-specific currency or images.
Why Is Sitecore So Popular?
Conversions
Sitecore outranks all other content platforms since its dedicated to business value. Site core has a track record of offering site traffic via SEO which often becomes conversions.
Performance and Scalability
Numerous tests by autonomous organizations prove that Sitecore exceeds other systems in terms of reliability, scalability, and speed. These are the main elements that make Sitecore a darling among businesses with plenty of content.
Safety
Sitecore offers a lot of safety-related configuration options. By default, Sitecore has advanced security permissions. This allows for role configuration in case you need to limit access to specific chunks of functionality.
Is Sitecore Similar to WordPress?
No, Sitecore and WordPress aren’t similar. In fact, they have several technical differences, but overall the largest one is their target markets.
Sitecore has positioned itself as the go-to enterprise-grade content management solution boasting bespoke workflows and personalization.
On the other hand, WordPress has positioned itself as a comprehensive content management platform offering solutions to everyone from bloggers to multinationals. When pitted against Sitecore, WordPress is the cost-effective solution but not the best option.
Should I Upgrade My Current CMS Environment to Sitecore What Are the Risks?
With the introduction of new features, Sitecore has now ceased support for older versions. As a result, it’s recommended that you upgrade to the new Sitecore versions to enjoy new features and an overall better version of this product.
So what are the risks of upgrading?
Obsolete APIs
Obsolete versions of 3rdparty libraries
Conflicts in fixing Sitecore’s setup
Does Content Management with Sitecore Have a Future?
At the moment CMS market is split into tools that incorporate Sitecore experience database features, such as Adobe AEM and Sitecore, and those that don’t, such as WordPress.
CMX (customer experience management) is the ability to identify an audience and personalize content according to their behaviors and interests. CMX is, at the moment, the key differentiator in the content management space.
The Sitecore platform is one of the few autonomous and organically developed CMS solutions, so the future of content management with Sitecore is very bright.
Final Thought
To sum it all up, Sitecore gives you access to all the customer engagement you need in one central location for you and your business to leverage as you deem fit. So if you’re not already using side core, you can hire .Net developer to help you out.
With the current real estate market boom, you have new clients coming in left and right, and you’re selling house after house; the last thing you want to do is comb through a messy spreadsheet to find a client’s information.
What’s the solution? It’s real estate software because it allows automation of most tasks taking your business to a whole new level. That said, let’s look at what real estate software is, the benefits, the best real estate software, and how to build a custom real estate software.
What Is Real Estate Software?
Real estate software is software designed to assist real estate agents and realtors by automating most activities that are part of their daily responsibilities.
This includes finding sources of new property leads, centralizing and organizing contact information, conducting email and telephone outreach, advertising their brands, checking the local and national real estate marketing, listing houses, closing deals, etc.
Real estate software is a realtor’s tool for establishing an efficient and successful real estate career. The right real estate tools can help agents with expense tracking, open house management, and video editing.
The main objective of the software is to make a relator’s life easier, organized, and more streamlined, so they can concentrate on what they do best; selling property.
Most real estate agents are independent, and as such, they are owners of small businesses. For such real estate professionals who opt to work alone or have a small salesforce finding software that offers blog creation, email marketing, and invoicing abilities is crucial.
What Is a CRM in Real Estate?
As a realtor, real estate CRM software is your sole source of truth for all matters to do with clients allowing you to cultivate relationships better and make data-driven decisions.
A CRM (customer relationship management) system is a web-based database designed to help with contact management and save time on data entry through automation.
So how can CRM software make your life easier?
Automating workflow such as email follow-ups for open properties
Gathering information digitally, such as a prospective client’s web activity and whether or not they read your emails and messages.
Keeping track of the potential clients you’ve contacted and which ones you haven’t.
Managing your sales pipeline in a centralized location and tracking closings.
Organize prospective clients’ information such that it’s easy to find.
Rapid response to property queries without needing to comb through your inbox.
Tracking which clients are further along the property acquisition process.
What Software Does Real Estate Agents Use?
When it comes to real estate, there are three software a realtor can use, namely:
CRM Software
A real estate CRM software works with existing contacts, find new contacts, targets various audiences, and maintains solid relationships with prospective clients.
This is perhaps the best solution if you’re a realtor and need to reach many clients, boost customer service, facilitate trustworthy reporting, and guide decision-making.
Some real estate CRM (customer relationship management) solutions for real estate are IDX (internet data exchangers) and MLS (multiple listing services).
ERP Software
ERP (enterprise resource planning software) is the perfect solution for accounting, delivery planning, inventory, procurement, and supply chain.
How does ERP apply to real estate? Some real estate solutions, such as property management software and RETS (real estate transaction solutions), are ERP software.
Custom Real Estate Software
Custom Real estate software is a highly-rated solution that provides excellent client support, affordable pricing, easy 3rd party integration, multi-user accessibility, reduced paperwork, and an easy-to-use interface.
Some examples of CRM software include expense tracking apps, online property marketplaces, property valuation engines, online tenant dashboards, and rent roll applications.
Custom real estate software gives you the best possible web experience. The primary focus of such software is a precise analysis of clients to create custom solutions for them.
What Is the Best Program for Real Estate?
AreaPulse
AreaPulse is a computerized real estate data-collection software that helps you quickly collect local market info and create reports to give to your buyers and sellers.
As one of the numerous vital software solutions for real estate agents, AreaPulse offers you visually pleasing and easy-to-read real estate research reports to help you make better decisions about pricing a property or negotiating sales transactions.
BoldLeads
BoldLeads is a real estate lead generation tool that helps realtors create and convert more leads, including property buyers and sellers.
Some of the features offered by BoldLeads include an integrated CRM solution that collaborates with numerous other popular CRM solutions for efficient lead management and landing page templates. BoldLead also provides automated emails and text follow-ups.
JotForm
JotForm allows realtors to collect info via form templates and have a database of crucial information for leads, follow-ups, transactions, etc.
You can easily configure the customizable real estate form templates to match the kind of property you’re selling and accumulate all relevant buyer info.
ShowingTime
ShowingTime helps you stay organized to manage numerous listings and open houses effectively. Its features simplified scheduling, feedback, and updating property photos.
Instead of depending on bulky, back-office tools, you can become digital, allowing you to promptly send listing reports within the software to clients and staff. ShowingTime also incorporates lockbox software such as SentriLock and Supra eKEY.
Structurely
Structurely utilizes AI (artificial intelligence) to help real estate agents and other small companies time when qualifying leads. Structurely utilizes a chatbot that works in real time with your Facebook Messenger and website.
The chatbot tool can do all the time-intensive work for you, such as asking questions and scheduling meetings. You can also use the Android or iOS mobile app when you’re on the go.
What Are the Advantages of Using Real Estate Software?
Boost Lead Generation Efforts
Real Estate software boosts lead generation. The features included in realtor software boost lead generation by allowing you to track deals, leads, and prospects. In-depth analysis of leads via reporting helps you make smart decisions on future lead generation efforts.
When incorporated with other solutions, these real estate lead generation capabilities are enlarged. You can interlink social media and site data to understand better each lead’s intent and interests based on their dealings with your business.
This software also allows you to use AI to forecast behaviors of new leads based on the mannerisms of those with similar buyer personas.
You can connect the software data to marketing automation to track lead time, demographics, and other factors affecting lead volume.
Simplify Document Generation
Real estate requires you to have many documents such as closing statements, contracts, title deeds, etc. Real estate software not only stores these documents for easy accessibility and reference, but it also helps create these documents by pulling data from a client’s account.
With this functionality, you’re no longer required to enter details and risk making errors manually. Computerized document generation tools with eSignature are standard add-ons for many real estate software solutions.
Standardize Approval Workflows
One of the best things about real estate software is how it aligns processes. For instance, approval workflows, which are business processes within the software that mandate agents to sign off on certain required actions through pre-set stages of a process.
You can establish approval workflows for as many processes as you like. Not only do workflows align your agents to a particular process, but they also keep you informed of the progress being made and automate tasks linked to the process at the suitable stage.
The Data Is Always Backed
The real estate industry is always changing in terms of homes for lease, rent, or sale, as well as rules and regulations. This means data is always changing and needs to be backed up.
Real estate management software can do this. As a realtor, it allows you and your brokers always to pull documents from the app should your physical systems go down.
Faster Payment
All professionals love to hear ‘get paid faster,’ and realtors are no exception. Commercial real estate management software allows for faster payments.
You can get payment within several days by sending automated payment reminders. This ensures your clients always pay their dues on time.
Real estate software can also help you enforce late charges in court as a realtor. Doing so ensures you’re paid on time by your customers. It also helps you keep track of pending, received, and sent payments.
Automation of Routine Tasks
The process of buying, leasing, renting, or selling property is time-intensive because of all the tasks involved. The best commercial real estate software solutions streamline this process by computerizing the task of filling out multiple forms repeatedly.
They also send constant alerts to notify realtors about changes in forms or current developments in the sector with regard to practices, rules, and regulations.
What’s more real estate agents have realized that they can stay ahead of payment cycles by computerizing late fees and payment notices.
Instant Communication
The latest real estate software has computerized communication tools. What does this mean for realtors? It means they can easily and instantly communicate with clients.
This is handy for landlords because they can have pressing issues that arise suddenly and need addressing late in the night or early in the morning. For instance, they can alert real estate agents if a property has suddenly flooded.
They can also alert realtors if a tenant has decided to prolong their lease. As a result, the agents can help their clients (landlords) seek legal help.
Secure
You most definitely have heard horrifying stories about massive security breaches if you’re a realtor. No one wants to be a victim of data or identity theft.
A real estate management program has multiple professionals whose role is to deter cybercriminals from accessing your information.
Some of these programs can secure your data by consolidating your documents, storing all data in a central location, usually in a dashboard.
Scalable
This is very vital to brokers or realtors managing multiple properties at the same time. It’s also of dual importance if the agents have made investments in properties they’re managing.
The software is integrated into the cloud, and realtors can access it whenever they want to. What’s more, they can utilize more and more memory and storage space if need be as their businesses grow. And they don’t need to pay more for this benefit.
Employee Management
The team members behind any real estate business needs to be well managed, and this becomes easier with the help of all-in-one real estate management software.
There are features like permitting a single account for multi-user access, multiple logins, and so much more. Organizational structure is vital, and with the help of comprehensive software proper hierarchy can be established.
This allows for transaction management and the creation of daily reports smoothly. Stagg benefits from this by creating task reminders, scheduling meetings, etc.
What Is the Most Common Real Estate Software?
CINC
When prospective clients search for more info about your properties or services, they expect prompt replies, which isn’t always possible.
CINC is a powerful and feature-rich real estate software that keeps you connected with your clients from start to finish so they don’t feel frustrated and you miss out on deals.
CINC will help you create and engage new leads by automating the lead nurturing process and building an IDX website from a single platform.
CINC’s reputable process helps you capture leads, close deals faster, and identify top-notch leads, maximizing your ROI (return on investment).
Pricing: Lead generation $500 per month, getting started as an individual agent between $600 and $1200 per month, and for large teams, roughly $1,500 per month.
Real Geeks
A CRM (customer relationship management) tool like Real Geeks is vital in tracking, organizing leads, and optimizing every email and follow-up call.
Real Geeks builds effective management with your customers, helps you picture their journey via the sales process, and notifications you to follow up steadily on each step of the way.
Automated features such as text messaging and email campaigns ensure constant communication with your contacts to keep them focused on you and your content.
Real Geeks also allows you to up your game with property valuation management tools and market reports to offer your clients up-to-date information and market trends.
Pricing: $300 per month plus $350 for onboarding up to two agents; additional agents are $25 per head. For marketing spending to manage PPC (pay-per-click) ad accounts, it’s $550 per month and an additional $50 per month to create seller leads.
RealScout
RealScout is a lead promotion tool that combs through your MLS to find listings that match your client’s criteria and automatically email them these listings.
RealScout sorts properties using up to 400 benchmarks, including high ceilings, number of rooms, waterfront location, etc. Best of all, the emails appear as if you sent them.
If you have many leads to promote, RealScout can helps you grow your business by boosting the quantity and rate of offers coming your way.
RealScout’s agent tool includes:
A branded search portal with precise MLS data
Team functionality with lead sharing.
Unlimited customers
RealScout’s brokerage package includes agent management, broker dashboard, lead dissemination tools, and user analytics. Pricing: $40 per head per month or $500 per month for the brokerage package.
REIPro
In contrast to all other real estate websites on this list, this one is designed for real estate investors. Not only does it have CRM and lead generation tools to track exciting properties, but it also provides workflow management so you can track all moving parts of a deal.
REIPro also provides unlimited access to its advertising materials at no added cost. Pricing: single user $97 per month, up to five users $129 per month, and up to 10 users $197 per month. Note that quarterly and yearly billing is available.
Zillow Premier Agent
Zillow Premier Agent is a very robust real estate website that draws its power from over 150 million monthly Zillow users. As part of Zillow’s free services, you can add new listings on the platform and claim listings uploaded to Zillow from your MLS (multiple listing service).
This puts your phone number in the upper-right corner of the listings tab alongside as many as three buyer’s agents who also appear on the list.
But when you become a Zillow Premier Agent, only your name will appear on your listings.
So when a buyer comes across your listing on Trulia or Zillow, there is a better chance of them making an inquiry and you earning the full commission. Pricing: $20 to $60 per lead depending on ad spend, competition, and ZIP code sales.
How Much Does Real Estate Software Cost?
In-house Real Estate Software usually costs between $100 to $1000 per user. Why? Because you need to pay for custom work, maintenance, support, and software updates.
Web-based real estate software, on the other hand, costs between $50 and $100 per user per month. But you can get services with fewer features for about $15 per user per month. For enterprise-grade software, expect to pay between $8000 and $20000 per year.
Most web-based real estate software has a trial period that lets you test the software for free. Take advantage of such offers to see what features are available in any software you’re considering. Make sure the interface is effective and easy to use.
How to Create Custom Real Estate Software Solution?
Custom real estate software solutions offer excellent customer support as well as an easy-to-use interface, easy 3rd party integration, reduced paperwork, etc.
Custom real estate software development gives your users the best possible online experience. So how do you build custom real estate software?
Deploy Cutting-Edge Productivity Tools
You already know that it’s a custom real estate tool you want to build specifically, so it’s time to decide on the technical background. Here is a list of smart technologies to make your custom real estate software dependable, flexible and robust.
AI and machine learning:to help construct prediction models, data visualization, and helping to drive personalization.
Augmented and virtual reality: To allow your clients to take virtual tours of properties before making a final decision.
Blockchain: Due to its superlative encryption features, it will help you safeguard vital documents such as contracts, reports, title deeds, etc.
Chatbot: Enable you to keep potential clients engaged at all times.
Data Science: Offers your business the required information on client behavior to help you make data-based decisions and optimize operations.
IoT (internet of things): To help equip all properties with smart sensors allowing them to be more energy-efficient and be controlled remotely.
Location-based service: Boost conversation rates relative to your personalized and untargeted approach to doing business.
Add the Necessary Features
If you want your custom real estate software to feature in real estate CRM software charts, ensure you add the following necessary features:
Advanced location search: Should include location-based navigation features such as number of floors, price, region, etc. This will help simplify the property hunting process for prospective clients by showing the matching ones on the map.
Enhanced Communication: The software should facilitate a seamless flow of information between you and your clients.
Payment Management: Your clients should be able to set, change and make payments with guaranteed safe storage for their financial details.
Property Inspection: Your custom software should have interactive templates and generate reports in the field to make this time-consuming task quicker.
Property Listing: Your prospective clients should be able to see a formatted list of all available properties via an easy-to-use interface.
Reduced Oversight: All information on properties should be updated automatically, so prospective clients get the info in real-time, 24/7.
Reports and Analysis: The software should generate in-depth reports with statistics on capitalization levels, return on equity, and total revenues. This allows you to get insights into the effectiveness of your campaign and even forecast your financial future.
Gauge Your Success
To sum up everything illustrated above, let’s highlight the results you should get once you launch your custom real estate software:
Communicate with clients better: The software should engage both existing and potential clients in your properties via chatbots and marketing campaigns. This should save time and keep your clients informed at all times.
Easy digital marketing: The software should automatically generate your social media posts and share updates as soon as the posts are made.
Higher lead conversion rate: The key benefit of custom real estate CRM software is that it should lead to better KPIs and higher lead conversion rates.
Sales and process automation: It should allow you to change, control, and modify each client’s profile from when they make first contact.
Having all these features means you have built a really good custom solution for your real estate dealings. So now that you know what you need and how to build custom real estate software get into it and nurture those leads.
Final Thought
To sum it all up, real estate software offers brokers and realtors client engagement and end-to-end sales automation tools. The software can find a suitable property for a client and allow clients to customize the search system; this will help your real estate company grow.